Project 1401-4


Marvy Uchida – Autumn Frame
By: Julie McGuffee
Sponsor: Marvy Uchida

For more information visit:

www.uchida.com

 
Punched shapes are a great way to make your own paper embellishments for cards, scrapbook pages and home dec items.  These cut and embossed leaf shapes are a great way to add a creative touch to a variety of projects.

Materials Needed:
  • Marvy® Uchida Clever Lever Embossing Craft Punch® - Oak Leaf
  • Marvy® Uchida Clever Lever Craft Punch® Craft Punches –
  • Mega Square and Extra Giga Scalloped Square        
  • Marvy® Uchida Paper Trimming Buddy™
  • Marvy® Uchida Ink Pads – 3 Autumn Colors
  • Marvy® Reminisce Gel Pen - Black
  • Mini Glue Tape™
  • DecoColor™ Acrylic Paint marker – Dark Brown
  • Squishy Scissors
  • 8” x 10” Beveled Edge Photo Mat
  • Scraps of cardstock in Autumn Colors including metallic
  • 7 ¾” 9 ¾” Chipboard
  • 12” Thin cotton crochet yarn or string
    Button
  • 1 yd Sinamay ribbon (optional)
    Glue

Note:  When choosing papers for your layout/project, look for colors and styles that complement your style.

Instructions:

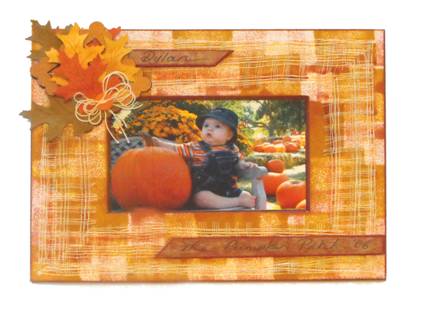
1.  Starting with the lightest color, randomly stamp the front of the photo mat with the ink pads.  Overlapping colors will create additional shades.

2.  Outline the inside and outer edges of the mat with the paint marker.

3.  Punch embossed leaves from scraps of cardstock.  Lightly swipe the front of each leaf with a darker color of stamping ink to highlight embossed design.

4.  Create square scalloped frame as follows:  Punch square opening first, then holding the punch upside down, position the scalloped punch around the opening then punch.

5.  Adhere the sinamay ribbon around the front of the frame.  Mitre each corner by overlapping the ends of the ribbon.  Cut from the outside corner diagonally across both pieces to the inside corner. 

6.  Create a caption or title with ½” wide strips of chipboard.  Lightly color with stamping ink then add wording with the gel pen.  Glue to front of frame.

7.  Embellish the front of the frame with assorted leaves and scalloped frame.  Make a multiple loop bow with the crochet yarn.  Glue in place then add a button to the center of the bow.

8. Position photo behind opening then secure with adhesive tape. Adhere the chipboard to the back of the frame to finish. 

Guest:

Beth Madland and Julie McGuffee


Copyright © 2009 Scrapbook Memories, All Rights Reserved