The following instructions will explain how to create a custom stencil using the Silhouette digital craft cutter and software and how to etch that design onto glass or mirror. Following these instructions you will be able to etch any design, including letters (Monograms) and words. The result is a permanent etch, so please read all the directions and cautions on the etching product.
If needed, additional information can be found at www.etchall.com. Please refer to the manual which comes with your Silhouette Digital Craft Cutter for basic operating instructions.
- Open a new, letter size document in the digital cutting software program.
- The project we etched on the show was a 4” x 4” mirror tile, so the first step is to create a 4” x 4” square.
- The flower design was chosen from “My Library”. Drag the shape into the center of the square. Size so there is about a ½” border around the shape. Drag the square and the shape to the bottom left corner of your screen, so that the design will be cut at the top, right hand corner of the etchmask.
- Place a sheet of etchmask on the cutting mat. Open the controller then select “Adhesive Vinyl” for the media type in the drop down menu. Make a test cut to ensure that only the yellow vinyl is being cut and not the backing sheet on the Etchmask. Make asjustments if necessary.
- After cutting, remove the etchmask from the cutting sheet. The cut area will be hard to see, so dip a corner of the cotton make-up pad into the colored etchall stencil powder then gently swipe over the cut area. The design will appear as if by magic! Cut the square from the large sheet leaving about a ½” border around the edge of the square.
- Delete the design, but NOT the square from the document on the computer. Place Etchmask Plus on the cutting sheet, then cut. My experience has shown that it cut cleanly, so I did not need to change the media type in the drop-down menu.
- Peel the square of etchmask plus from the sheet then, with edges aligned, place on top of the design on the yellow etchmask. Press etchmask plus firmly into place using the squeegee. Carefully peel the backing from the etchmask then place your stencil onto the surface. Press firmly into place with the squeegee.
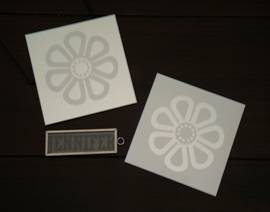
- Remove the etchmask plus from the top of the yellow stencil. Use the detail pick tool to remove the vinyl from the areas you wish to etch. Place the point of the tool into the center of the piece you wish to remove, not the edge then lift away. The edges need to stay sharp. NOTE: Each stencil gives you an option to create a design using the negative parts of the stencil or the positive parts. In other words, you can etch the design by removing those design pieces, or you can etch around a design by leaving those pieces in place and removing pieces from around the design. (See photo of samples.)
- Working over a protected surface, open the etching cream then carefully pour onto one corner of the stencil. You will need more cream rather than less*. Do not pour onto the design itself! You may want to adhere some extra pieces of etchmask onto the mirror at this corner to create a larger area for the cream. Use the squeegee to spread the cream over the open areas of the design. Use a smooth motion as if you were icing a cake. Don’t be concerned about having too much cream – it’s re-usable!! Let sit for at least 15 minutes.
- After at least 15 minutes, use the squeegee to scrape the cream off the stencil back into the container to be used again and again. Rinse project thoroughly over a plastic or metal container of water removing the stencil material as you rinse. Dry with a towel or soft cloth. Please remember, etchall is permanent. It is used to etch glass, mirror, slate, marble, china and porcelain. Therefore, you will not want to rinse over any of these materials.
*You can also etch with dip’n etch which is a liquid. Pour about ½” (enough to cover tile) of dip’n etch into a plastic container a little larger than the mirror tile. Gently place the tile into the liquid. Leave for 15 minutes then remove the tile and rinse. Pour the dip’n etch back into its container to be used again.
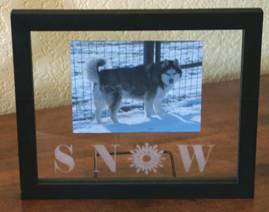
Etched designs are a wonderful way to add personalized decorative accents to your home. See the “Snow” photo frame sample shown above. A personalized glass frame is a great gift for anyone, including yourself. Frames can be personalized with a name or personal monogram – ideal for a wedding, or any kind of gift. Being able to design and cut your own stencils using the Quickutz Silhouette and then etch is fantastic. Be creative…Enjoy!
|