|
|
|
|
|
|
|
|
| |
|
|
|
| |
 |
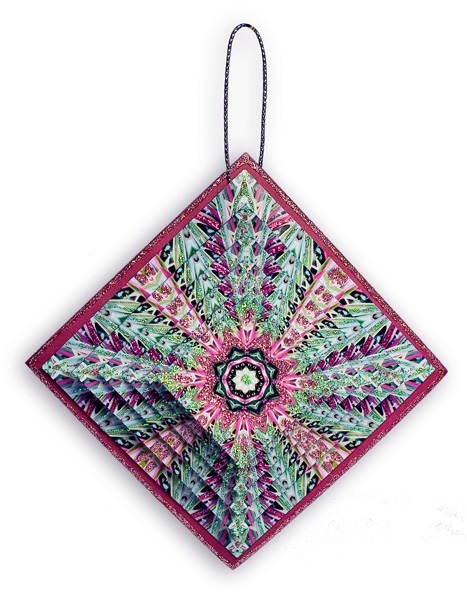
Kaleidoscope Collections:
Layered Kaleidoscope Ornaments
By Jeanie Sumrall-Ajero
Sponsor: Kaleidoscope Collections
|
|
Materials Needed: |
-
Software: Kaleidoscope Collections: Kaleidoscope Kreator™ 2.0
-
Printer: Epson Inkjet printer
-
Photo paper: Glossy inkjet paper
-
Adhesive: Foam squares, permanent flat squares
-
Digital or scanned photo
-
Other: 3.25” square of cardstock, Cording (for hanging loop)
|
Instructions: |
- Open digital photo in Kaleidoscope Kreator 2.0 (File>Open Image). Click on the wedge button in the toolbar to choose one of the square template shapes. Move the photo around in the workspace to create a kaleidoscope design to your liking.
- File>Custom Print Options>Print Multiple. Enter “3.0” in the inches field, “2” in the next field, then click Add. Change the size to 2.5” and click Add. Continue in this manner with 2.1”, 1.75”, 1.45” and 1.2”. Check the Print Margins box and set the Margin Size to 0.1”. Uncheck “Show Cutlines” and then click “OK”.
- In the printer dialog that appears next, choose your printer and set it for landscape mode and glossy photo paper. Click OK to print. All of the kaleidoscopes should fit on one sheet of photo paper.
- Cut out each of the squares. Create two piles with one of each size kaleidoscope in each pile. Using one pile, stack the squares on top of one another from largest to smallest with the largest on the bottom. You can offset or twirl each square to see if you like that look. Experiment to see which arrangement you like best. Decide which elements of the design you want to accent with glitter.
- Unstack the squares and apply glitter glue in the areas you want to accent. Remember, most of the squares will be “hidden” by the square that will be placed over it, so only the smallest square needs glitter in the center of the design. Let dry.
- Cut a 3.25” square from coordinating cardstock. Apply glitter glue around the edges. Let dry. Attach hanging loop with strong adhesive.
- Apply foam adhesive to the back of each of the squares except the largest ones. For each “pile” of squares, remove paper backing from foam adhesive and stack the kaleidoscope squares from largest to smallest.
- Apply permanent (flat) adhesive to the back of each of the largest squares and adhere to each side of the cardstock square.
|
|
|
|
|
|
 |
|
|
 |
|
Copyright © 2008 Scrapbook Memories, All Rights Reserved |
|
 |
|
 |
|
|