Project 1212-4c


Hot Off the Press –
Oversized Punctuation

Presented By Sara Naumann
Sponsor:  Hot Off the Press

For more information visit:

www.paperwishes.com


Oversized punctuation: Sun & Water = Fun!


Materials Needed:
  • Paper Wishes Personal Shopper July 2007 Kit: Papers and embellishments
  • Black inkpad
  • Black pen with fine and blunt or brush tip
  • White paper
  • X-acto® knife, cutting mat
  • 1/8" round punch


Instructions:
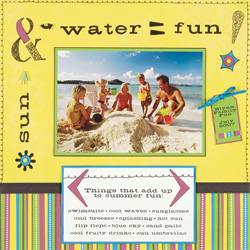
  1. Use the yellow with dots and stripes border as the background, placing the border at the bottom of the page. Use the black pen to draw a scribbles outline around the edge of the yellow paper. Mat the photo on lime green paper and ink the edges black. Glue centered on the yellow portion of the paper.
  2. Hand letter the words for the title, then use the Thinga-ma-jigs Template to add shapes between the word: Add the pinwheel on the left, just above the border, then the “&” at the top left corner and between “water” and “fun”, add an “=”, then an “!” after “fun”, using the star shape instead of the period. Use the brush tip of the pen for filling in the spaces that you want completely black and the fine tip for the scribbles. Add a lime arrow brad under the “&” and a black curved arrow brad to the right of it.
  3. Journal on white paper and cut to a rectangle. Add a scribbles border at the top of the journaling. Mat on blue paper, ink the edges black and glue below the photo.

Trace the circle from the pinwheel center, the arrow, a portion of the “&” and the star and circle dot of the “!” onto various colored papers with the fine tipped pen,

  1. then cut out leaving the black border. Also trace two arrows out of purple paper. Layer the cut out shapes over some of the drawn shapes. Cut out purple arrows and add at the sides of the journaling. Add yellow brads to the centers of the pinwheel and star of the “!”.
  2. Cut out the tag and journal on it. Punch a hole in the top and tie with ribbon. Add to the right of the photo.

Tip:
I used the Thinga-ma-jigs template to draw the designs directly onto the page, then filled in the spaces by scribbling in circles, flat lines, or filling it in completely. For a more dimensional look, I glued portions of the designs cut from solid paper over the drawn shapes.

Project Images:
Guest:


Sara Naumann and Julie McGuffee


Copyright © 2008 Scrapbook Memories, All Rights Reserved