Introduction:
Are you looking for a way to speed up your scrapbooking?
Are you struggling with scrapbook composition and layout designs?
Maybe you are new to digital scrapbooking and would like help getting started.
Layered templates might be just what you are looking for. A quick way to put together digital scrapbook pages, layered templates provide the basic framework for you - allowing you to focus on the fun parts of the layout: selecting photos, papers, and embellishments!
Our layered templates are a good starting point for a digital layout, but you can add your own personal touches to make the page your own. You can add or delete components, change the colors, add text and titles, make components transparent, rotate the templates, and give the layout your own unique creative touch.
 Step-by-step Instructions: To use the Layered templates, first download a template, scrapbook papers and embellishments from epsoncreativezone.com. You will also need several photos and Photoshop Elements 2.0 or higher (or the full version of Photoshop PSCS or higher.) Step-by-step Instructions: To use the Layered templates, first download a template, scrapbook papers and embellishments from epsoncreativezone.com. You will also need several photos and Photoshop Elements 2.0 or higher (or the full version of Photoshop PSCS or higher.)
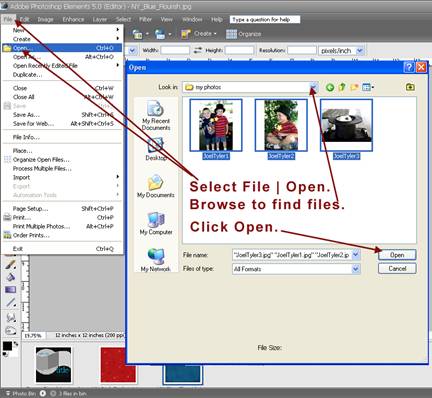
1. Open the template, photos, and several digital papers in PSE by selecting File | Open from the Menu Bar. Browse to find the template, digital papers and photo files on your computer, then select the items you wish to open by holding the Ctrl key while clicking several photos.
Selecting Open will bring the photos into your PSE photo bin and workspace.
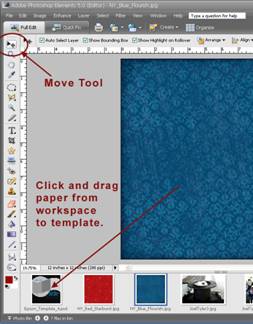 2. To "glue" paper to the template, select the Move Tool. Click on a digital paper in the photo bin. This will bring the paper into your workspace. Click and drag the paper onto the template in your photo bin. 2. To "glue" paper to the template, select the Move Tool. Click on a digital paper in the photo bin. This will bring the paper into your workspace. Click and drag the paper onto the template in your photo bin.
When you release, the template will appear in the workspace. The paper you have selected will be on top of the template.
3. If the paper is smaller than the template, simply move your cursor to one of the corners of the paper. You will notice a diagonal arrow appears as you hover over the corner of the paper. Click this arrow, dragging outward. This increases the size of the paper. Once you are satisfied with the size of your paper, select Enter to confirm the new size.
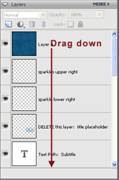
4. At this point, your paper may be on top of your layout. To arrange the paper into its proper place, you will use the Layers Palette in the lower right section of the window.
Notice that your template file has many, many layers. Identify the layer you want to cover.
Click on the paper layer, then drag it downward until it rests directly above the layer where you would like the paper to be "glued."
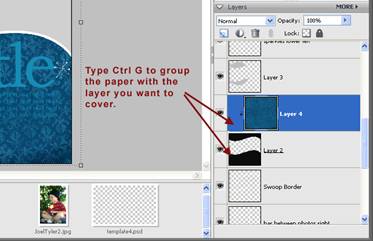
When the paper is in place, type Ctrl + G to "group" or paste the paper to the layer.
Note:
For CS2 & CS3: Ctrl + Alt + G
For Mac: Cmd + G
For CS2 Mac: Option + Cmd + G
In this example, we have grouped the patterned paper with the background. It is pasting the digital paper over the background layer, covering it completely.
Repeat this step with your remaining papers and photos to cover each layer of the template. You can even use a photo as a background using these templates!
Note: You will still be able to resize and move photos and papers after they are grouped. This makes placing photos an easy task!

To delete a layer:
Some layers of the template are simply place holders (such as Title layers.) To delete these, select the layer in the Layers Palette. Click and drag the layer up to the trash bin.
To create a vellum layer:
If you need to create a vellum look with one of your template layers, select the layer in the Layers Palette. Locate the Opacity value in the top right corner of the Layers Palette. Decrease the number (from 100%) to create a translucent, vellum appearance.

To add text to your layout:
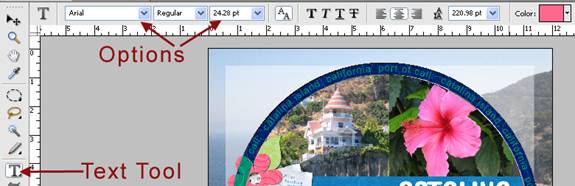
To add journaling and titles on top of your layout, begin by selecting the top layer in the Layers Palette. This ensures that your text will sit on top of the layout and not "hide" underneath the layers.
Select the Text Tool and begin typing. Your text should appear on top of your layout.
You can change the font, color and size in the Options Bar above the workspace.
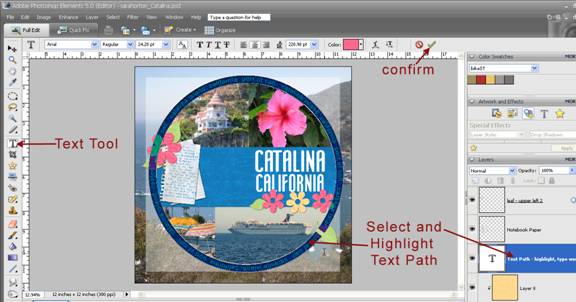
If the template contains a text path, such as circle, select the Text Tool and simply highlight the entire text path. Begin typing your own text to change the words.
Change the font, size, and color in the Options Bar. Once you are happy with your text, select the green checkmark to confirm your text.
To add embellishments to your layout:
Adding extras to your template is quick and easy! Open the embellishment file (such as a brad, ribbon, or tag.) Click and drag the embellishment on top of the template. To move the embellishment above or below a layer, simply drag the embellishment layer up or down in the Layers Palette.
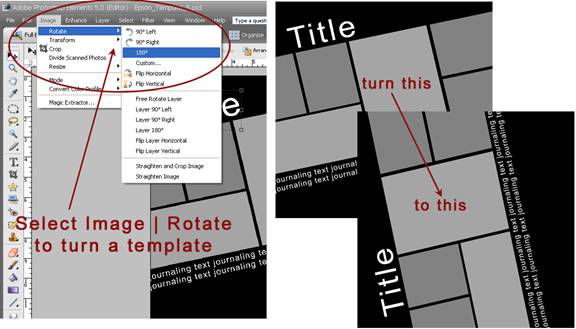
To rotate a template:
Templates are very versatile. To change the orientation of the design, it's simple to turn the template. Select Image | Rotate from the Menu bar. Select any of the commands on the top section of the flyout menu to rotate your entire layout. (The commands below the solid line rotate a selected Layer only.)
Starting with a template is a fun and easy way to jump-start your scrapbooking project. Make a quick layout today using one of our Layered Templates and digital scrapbooking papers available at no charge at epsoncreativezone.com. |