Travis & Trea
Designed by Susan Cobb
Presented by Sara Naumann
For more information visit: 
|
| Susan’s Designer
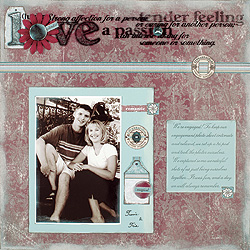
Tip: I used a combination of sanding and inking to distress
the background paper and embellishments on this page, giving it
a worn and well-loved look. The 22mm brad is functional as well
as decorative, holding on the clear transparent sheet. Susan sanded,
then inked the black brad with white to give a distressed look. |
|
| Materials
Needed |
 |
Paper Pizazz® Busy Scrapper’s
Solution Vintage Papers |
|
Masculine Embellish-abilities
|
|
12” x 12” Love Overlay |
|
1 sheet solid light blue paper (8 1/2
x 11) |
|
1/2 sheet solid white paper |
|
Sandpaper |
|
X-acto® knife, cutting mat |
|
Black pen |
|
White Staz-on inkpad |
|
Black inkpad |
|
Zots™ |
| |
| Instructions
|
| 1. |
Sand the vintage red background, making sure to sand
some straight edges into it at varying angles. (You can do this
by placing a piece of paper beneath the background while sanding.)
Press the white inkpad along the edges of the paper and let dry.
Ink the edges with black. |
| 2. |
Place the “Love” overlay over the background,
aligning the edges of the overlay with the top of the vintage red
paper. Glue the white textured tag to the background paper, beneath
the "L" in the word love. Cut out the striped border and
the "extraordinary" paper ribbon slide. Cut slits in the
lines of the ribbon slide, then slide onto the striped border. Glue
the border and ribbon slide to the background paper beneath the
words, about 3" from the top. |
| 3. |
Sand the black Great Big Brad™ and ink it by
pressing the white inkpad at the edges. Place the burgundy silk
flower over the "o" in “Love” and use your
knife to make a hole through the background paper and overlay. Insert
the Great Big Brad™. Sand and ink a small black button with
white, then thread a thin strip of blue paper through the button
holes, cross the ends, and glue over the top. Attach over the "o"
in "passion" on the overlay with a Zot™. |
| 4. |
Mat the photo on white, leaving a thin border. Glue
to the left side of a 6" x 7" piece of solid blue paper.
Press the white inkpad along the right edge of the blue mat. Let
dry, then ink the edges black. Cut out art and sand the edges. Add
to right side of blue mat, folding the aqua paper ribbon fragment
as a tab for the blue and white tag. Sand and ink the remaining
small button and burgundy Great Big Brad™. Add "magical"
word fragment over the brad, trimming edges evenly with the brad
edges (tip: turn the brad upside down, then you can easily trim
the edges evenly). |
| 5. |
Attach the matted photo to the page and add the Great
Big Brad™ to the tag, attaching it through the paper, overlay,
and background paper. Thread a thin strip of blue paper through
the hole of the button, trim the ends, and attach with a Zot™
to the center of the "celebration" circle art; let the
ends of the blue strip extend beyond the sides of the button. |
| 6. |
Journal on solid blue paper with the black pen. Ink
the edges with white, let dry, then edge in black ink. Glue to the
right side of the background paper beneath the overlay, adding a
flower square at the lower left corner. Use a Zot™ to attach
the edge of "splendid" ribbon fragment beneath the black
great big brad at the flower center. Add names with the black pen. |
| |
|

Sara Naumann & Julie McGuffee
Sponsor: Hot Off the Press |
|