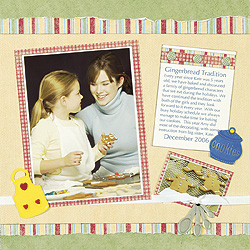
Baking Cookies Designed by LeNae Gerig
Presented by Sara Naumann
For more information visit:
LeNae’s Designer
Tip: The brads included with the buddies will secure them
to the page, but a small amount of adhesive behind each will keep
the buddy from sliding back and forth on the page. Sand the top
of the Cookie Jar to make the words stand out.
Materials
Needed
Paper Pizazz® Flea Market Fabric
sarapapers™
Cooking Brad Buddies™
Flea Market Fabrics Embellish-abiliites™
White cardstock
X-acto® knife, cutting surface
Black inkpad
Foam tape
Clear Tape
Sandpaper
Instructions
1.
Tear two 2” x 12” strips of striped paper.
Use your fingertips to roll one long edge on each strip. Cut a 9”
x12” rectangle of yellow and ink the long edges black. Glue
the torn edge strips to extend from behind the yellow as shown.
Center and glue over the textured green paper.
2.
Mat the 5” x7” photo with white cardstock,
leaving a 1/8” wide border. Ink the edges black and mat again
with red checked paper. Crop a photo of the cookies and mat with
white and red checked paper.
3.
Tape the ends of 2 white ribbon lengths to the back
of the page, about 2” from the bottom and secure with tape.
Bring the ends together on the front right of the page and knot.
Secure the small photo and Spoons Brad Buddies™ behind the
knot.
4.
Glue the large photo to the left side of the page,
overlapping the ribbon at the bottom. Secure the Apron Brad Buddy™
in the lower left corner of the photo. Computer journal and print
in blue ink onto white cardstock. Trim to a rectangle, leaving a
1” border at the top. Add strips of striped and checked paper
at the top of the rectangle and insert three green gingham brads,
evenly spaced. Glue to the right side of the page as shown. Sand
the Cookie Jar Brad Buddy™ and add to the bottom right of
the journaling.