Small –
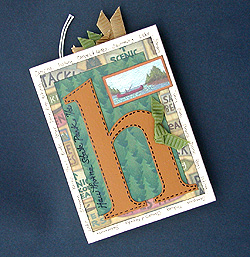
Great Outdoors Accordion Album
Designed by Barbara Swanson,
American Traditional Designs®
Presented by Julie McGuffee
For more information visit: 
|
|
Materials Needed for Great Outdoors Projects |
|
 |
Sakura® Glaze Pen |
|
Sakura® Gelly Roll Pen |
|
Sakura® Fine Point Pen |
American
Traditional Designs products: |
| |
Accordion Album, Tan (#AL-0002)
|
| |
Papers: Nature Map (#PA-0907), Rustic Signs
(#PA-0906), Evergreen Forest
|
| |
(#PA-0905) and Nature Patchwork (#PA-0908)
|
| |
Stickers: Great Outdoors Alphabet (#ST-1339) and Great Outdoors
Embossed & Glittered (#ST-1345)
|
| |
Tag Pack: Great Outdoors (#EM-1314)
|
| |
Mini Rub-On: Great Outdoors (#RO-1554)
|
| |
Elevations™: Great Outdoors (#ST-1341)
|
| |
Ribbon: Fancy 1 Earthtones (#EM-1079)
|
| |
Textured Card Stock: Reawaken (#PA-0659)
|
| |
Expressives™: Memo Cream (#ST-1532)
|
|
Paper Trimmer |
|
Scissors |
|
Adhesive |
|
Hole punch |
|
Ruler |
|
Stapler |
|
Acrylic paint and brush |
|
Ivory note card |
| |
| Instructions |
| 1. |
Cut papers as follows
Natures Map – one piece 5.25” x 11.25” and one
piece 5.25” x 3.75”
Rustic Signs – one piece 12” x 3.75” and two pieces
5.25” x 3.75”
Evergreen Forest – two pieces 5.25” x 3.75” and
one piece 4.5” x 3”
Card stock, Rusty Brown (or color of choice) – cut each piece
slightly larger than
the photo or sticker to be centered on it.
|
| 2. |
Front Cover – Center and adhere one of the smaller Rustic
Signs paper. Center and adhere the small Evergreen Forest paper.
Paint an Expressives letter with desired acrylic paint and let dry.
Accent the letter with the Glaze Pen and adhere to the front cover
as shown. Embellish with desired accents to complete the front. |
| 3. |
Page 1 – Center and adhere one of the remaining Evergreen
Forest paper. Ink the edges of one of the tags and add journaling.
Fold two different 3” lengths of ribbon through the top opening
and staple in place. Center and adhere the tag to the page, trim
the edges of the ribbon to desired length and add some journaling. |
| 4. |
Page 2 – Accordion fold the longer Nature Map paper into
thirds (finished size 5.25” x 3.75”). Center and adhere
the back section to the page, leaving the remaining sections free
to unfold. Adhere a mounted photo to each section and accent as
desired with Rub-Ons and stickers. Use the Gelly Roll Pen to embellish
the canoe.
Elevation
|
| 5. |
Page 3 – Center and adhere the 5.25” x 3.75”
Nature Map paper. Adhere a photo and accent with Rub-Ons. Use the
Gelly Roll Pen to embellish the fishing basket. |
| 6. |
Page 4 – Create a pocket from the longer Rustic Signs paper
as follows: Lay the paper face up. Measure the paper at 6.75”
from the bottom and fold up. Fold the 6.75” section again
and align the cut edge with the fold at the lower edge. Crease to
form fold at pocket top. Adhere flap and sides of pocket to secure.
Center and adhere pocket to page. Accent with mounted sticker accented
with “stitching”. Fold 3” lengths of ribbon in
half and staple to top of mounted photo and medium tag. Write notes
on the tags and back of the photo and insert into pocket. |
| 7. |
Page 5 – center and adhere an Evergreen Forest paper to
the page. Adhere a mounted photo as shown. Accent with a sticker.
Embellish the leaf and page edge with the Gelly Roll Pen. |
| 8. |
Page 6 – Adhere a mounted photo to remaining Rustic Signs
paper as shown. Center and adhere to the page. Accent with sticker,
Rub-On and journaling. |
| |
|
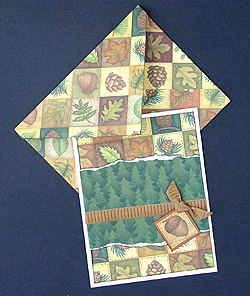
| Smaller – Great
Outdoors Card & Envelope |
| 1. |
Cut papers as follows
Nature Patchwork – one 8” square piece, one piece 5.25”
x 4” and one image square of choice.
Evergreen Forest – one piece 5.25” x 3.5”
Cardstock – Rusty Brown (or color of choice) – one piece
cut slightly larger than the image square
|
| 2. |
Tear the longer edges (top and bottom) of the Evergreen Forest
paper. Center and adhere to the Nature Patchwork paper, folding
and adhering the side edges toward the back. Adhere a 5.5”
length of ribbon to the Evergreen Forest paper as shown, adhering
the ends toward the back. |
| 3. |
Use a fine point pen to add “stitch” lines along the
edges of alternating squares of the Nature Patchwork paper to create
a quilted look. |
| 4. |
Center and adhere the layered paper to the card front. |
| 5. |
Mount the image square onto the card stock. Use a fine point black
pen to accent the image with “stitches” and line-work.
Adhere to the card front as shown. |
| 6. |
Tie a knot of ribbon. Trim the ends and adhere to
the top corner of the image square. |
| 7. |
Envelope – Place the 8” Nature Patchwork paper face
down on a clean smooth surface.
Place the card on the back of the paper, having the straight sides
of the card center between the points of the envelope square. Fold
the sides in so the envelope is secure but not tight (the points
won’t touch, but they will alight). Fold the bottom up and
top down in the same manner. Remove the card. Trim off approximately
1.25” from the bottom triangle. Adhere the bottom edges to
the sides. Insert your card, seal closed and add and address label.
|
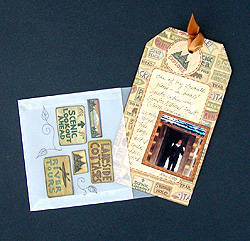
Smallest – Great
Outdoors Pocket Tag |
| 1. |
Separate the two tags that are joined by a ribbon. |
| 2. |
Adhere the larger tag to a slightly larger piece of card stock
and trim the card stock to fit. Punch a hole in the card stock to
align with the one in the tag. |
| 3. |
Accent as desired with a fine point black pen. Use the ribbon
to reattach the tags. |
| 4. |
Mount a small photo onto a slightly larger piece of card stock
and adhere to the front of the tag. Add journaling. |
| 5. |
Adhere a photo on the back of the tag and add journaling. |
| 6. |
Cut assorted images from the Rustic Signs paper. Adhere to the
front of the vellum pocket as desired. Use a fine point black pen
to accent the images and the pocket as desired. |
| |
|

Julie McGuffee
Sponsor: Sakura Color Products
of America |
|