Epson Computer
Tip – It’s A Small World After All
(Using Index Sheet Size Prints on your Pages)
By Barbara Kotsos
 For
project ideas and more, visit www.epsoncreativezone.com For
project ideas and more, visit www.epsoncreativezone.com
|
| One large photograph can
start telling your story. However, accent your projects with several
smaller photos to tell the whole story and capture more attention.
When one large image serves as your focal point, additional smaller
images can easily convey more details. This clever use of both large
and small photos can be accomplished quickly with the use of index
prints, sometimes called contact sheets (in Photoshop Elements).
So break out of your standard photo size rut and get creative. |
| 1. |
Open Adobe PSE 5.0, click on Edit & Enhance Photos
|
| 2. |
Once the Editor Screen is open, locate
and open the images with which to work when creating your project.
a. For this sample, we’ll work with pictures from Tara’s
recent camping trip. |
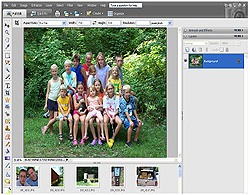
| 3. |
Choose the photo that will be your
focal point and edit and crop it accordingly.
a. The group shot of all the kids is perfect for the main image.
We’ll edit, crop and print this picture as a 5”x7”.
|
| 4. |
Next, take a look at the remaining open
pictures and determine how they will best convey the story of the
family’s weekend adventure in the state park.
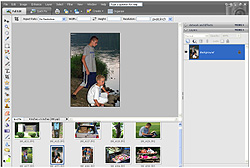
a. For this sample, we’ll choose maybe 6-10 other images to
accent the primary image.
|
| 5. |
Once your accent (additional) images
are selected. Edit each, as necessary. |
| 6. |
To print a Contact Sheet (index print)
of these images, in Photoshop Elements, click on File > Print
Multiple Photos. PSE will open up Organizer. Organizer will assist
you in processing/handling multiple images in one application or
command (such as printing multiple photos). 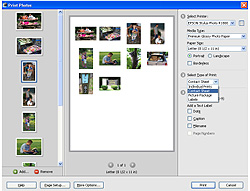 |
| 7. |
 A Print Photos window will open and
at that time, you must set your preferences. A Print Photos window will open and
at that time, you must set your preferences.
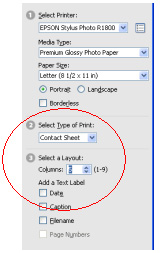
a. In this sample, we’re going to:
1. Select Printer: Epson Stylus Photo R1800, printing on Premium
Glossy Photo Paper, sized 8.5”x11”, Portrait Orientation
2 . Select Type of Print: Contact Sheet
b. Also, in the Print Photos window, you’ll have the ability
to size the prints smaller or larger on the contact sheet, by specifying
the number of columns in which to print. The larger the number of
columns, the smaller the print size.
1. Make sure to “uncheck” any of the Text Labels which
might be applied to the images. It won’t harm the print quality,
but by removing these labels, you’ll have a wider and cleaner
area from which to trim your photos.
|
| 8. |
Once your contact sheet specifications
are set, click Print. |
For
another easy option, print Proof Sheets from smaller stand alone
printers, using the built in editing and printing functions. |
| 9. |
Power up your portable printer and
insert your camera card, memory stick or CD. |
| 10. |
Once the images are located and appear
on the viewer screen, press the Menu button. Using the arrow keys,
select Layout. Press OK. |
| 11. |
At this time you may choose from assorted
smaller sizes, including Proof Sheet (which holds 20 photos per
4x6 page). Locate Proof Sheet and press OK. |
| 12. |
The viewer screen will return to the
photo previews. Press the button under the words Select All. Then
press the button under the word Proceed. |
| 13. |
Lastly, press the Print button. In
less then 30 seconds, you’ll have a printed 4x6 Proof Sheet,
filled with small accent photos ready to be trimmed and placed on
your project. |
|