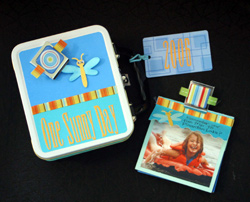
Remember When
it was the coldest, hottest etc....
'Tin Album'
By Heather Lancaster
|
| Materials
Needed |
|
 |
Cricut™ Cutting
System |
|
Cricut™ Doodle Charms Cartridge
- 29-0021 |
|
Cricut™ Stamped Alphabet Cartridge
- 29-0013 |
|
Cricut™ Blues Papers - 40-1626
|
|
Rob & Bob Plastic Tags Summer Days
28-1060 |
|
Rob & Bob Epoxy Stickers 43-6519
|
|
Provo Craft® Small Lunch Box Tin
28-2696 |
|
Magnet Square Clips x 2 - 28-2399 |
|
Ribbon, Adhesive, Ink |
|
Plastic Eyes (for dragonfly) |
| |
|
| |
| Instructions |
| FOR OUTER TIN: |
| 1. |
Cut paper to fit front of tin. If desired use rounded
rectangle from 'George' cartridge, or cut by hand. Adhere in place
with ribbon covering seam. |
| 2. |
Cut one 2" dragonfly body using Doodlecharm cartridge,
and one yellow dragonfly body. Adhere together and add googly eyes.
|
| 3. |
Cut short piece of ribbon and attach it to the square
magnet clip using a Rob & Bob epoxy sticker. Place dragonfly
in clip and attach to front of tin. |
| 4. |
Cut titles 2" tall using the Stamped Cartridge
with the 'Smooth' feature on. Adhere in place on tin and a plastic
Rob & Bob tag. Attach tag to handle. |
FOR INSIDE
ALBUM: |
| 1. |
Chose 3 or 4 sheets of blue paper from the Cricut
Blues Paper Pad. Out of each sheet of paper, cut 2 card bases located
on the Doodle Charm Cartridge. Cut each card base at 5.5" with
the 'real dial size' feature on. |
| 2. |
Score and fold the decorative edge of the card over
appx. 2" on each card base, then score again so that the flap
will flip up again when held by the clip. |
| 3. |
Adhere pictures on each card base and secure the tops
together using a second Square Magnetic Clip, decorated in the same
manner as above. |
| 4. |
Cut 11/4" suns, dragonflies and sand castles
with the Doodlecharms Cartridge. Embellish each with inks and adhere
to your mini album pages. |
| 5. |
Insert your mini album into the tin, placing it on
the back side of the lid. Fill the other side of your tin with memorabilia
from your trip, sealed inside of a page protector. |
| |
|
| Sponsor:
Provo Craft® and Novelty, Inc. |
|