 Do
you remember the old paper cut-out silhouettes hanging on
your grandparent’s wall? You can do the same thing with
any of your photos. This technique works best with a profile
photo, but there are some other uses for silhouettes that
we will discuss later. Do
you remember the old paper cut-out silhouettes hanging on
your grandparent’s wall? You can do the same thing with
any of your photos. This technique works best with a profile
photo, but there are some other uses for silhouettes that
we will discuss later.
You can use just about any graphic editing program, but
we will be using Photoshop Elements 4.0 (PSE) for demonstration
in this article.
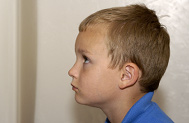
Open the photo you want to use as a silhouette in PSE.
If you don’t happen to have the ‘perfect’
photo, take a quick snapshot. For the easiest results, take
the photo with a solid, contrasting-colored wall as a background.
You will see why this is important in a minute.
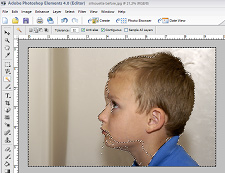
 You
can use any of the selection tools that you prefer for this
technique, but the goal is to select your subject and remove
the background. If there is enough contrast between your
subject and the background, try using the Magic Wand tool
to select the background. For this photo, it did a fairly
good job, but as you can see, it selected portions of Jake’s
face as well as the wall. We have a few options at this
point. We can use the Selection Brush Tool to clean up the
selection, deselect (Ctrl D) and start over using the Lasso
Tool or use the new Magic Extractor Tool. You can open the
Magic Extractor by selecting it at the bottom of the Image
menu. (Image | Magic Extractor) You
can use any of the selection tools that you prefer for this
technique, but the goal is to select your subject and remove
the background. If there is enough contrast between your
subject and the background, try using the Magic Wand tool
to select the background. For this photo, it did a fairly
good job, but as you can see, it selected portions of Jake’s
face as well as the wall. We have a few options at this
point. We can use the Selection Brush Tool to clean up the
selection, deselect (Ctrl D) and start over using the Lasso
Tool or use the new Magic Extractor Tool. You can open the
Magic Extractor by selecting it at the bottom of the Image
menu. (Image | Magic Extractor)
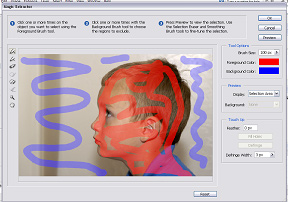
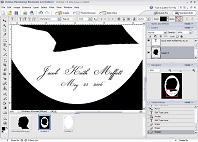
The Magic Extractor opens a dialog box that allows you to
scribble red over your subject and blue over the background
to determine what should be kept and what should be removed.
Click on the preview button to see what your selection will
look like. If the selection does not come out perfectly,
you can add and remove areas using the red and blue brushes
and then preview your selection again. If the selection
looks jagged and there are holes in your subject, select
the option Fill Holes. This will generate a new preview.
Once you are happy with your selection, make sure that you
use the Defringe option set to about 5 pixels. Defringing
removes the outside 5 (or whatever number you select) pixels
to prevent any unwanted shading or random color from being
included in the selection. Click OK to accept the selection
changes and your image will now look something like this:
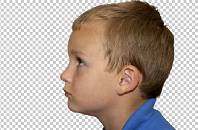
 Don’t
worry about the gray & white checkerboard pattern. This
is PSE’s way of showing transparency. Now that you
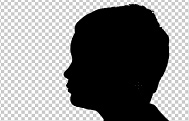
have your subject profile ‘cut out’, we need
to fill it with black or whatever color you choose. To fill
only the profile and not the entire layer, hold the Ctrl
key down while clicking on the Layer Thumbnail in the Layers
Palette. This command selects everything in the layer and
puts a Marquee (or marching ants) around the subject. Now
check your Foreground/Background Color Chip (at the bottom
of the Tool Palette) and make sure that the foreground color
is set to black. If it isn’t, select D on your keyboard
to set the colors back to the default. From the Edit menu,
select Fill Selection. Make sure that your option in the
drop down menu is set to Foreground Color and click OK.
Voila! Don’t
worry about the gray & white checkerboard pattern. This
is PSE’s way of showing transparency. Now that you
have your subject profile ‘cut out’, we need
to fill it with black or whatever color you choose. To fill
only the profile and not the entire layer, hold the Ctrl
key down while clicking on the Layer Thumbnail in the Layers
Palette. This command selects everything in the layer and
puts a Marquee (or marching ants) around the subject. Now
check your Foreground/Background Color Chip (at the bottom
of the Tool Palette) and make sure that the foreground color
is set to black. If it isn’t, select D on your keyboard
to set the colors back to the default. From the Edit menu,
select Fill Selection. Make sure that your option in the
drop down menu is set to Foreground Color and click OK.
Voila!
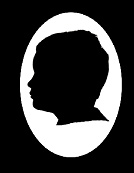
Now that your subject silhouette is complete, we need to
create the traditional white oval matte and black double
matte behind it. Open a new document (Ctrl N) and select
the size 8x10 at 300 ppi. Fill the entire new canvas with
black by selecting the Paint Bucket Tool (K) and clicking
on it. We will come back to this document in a moment. To
create the oval matte, we need to again create a new 5x7
document. This time, switch the foreground and background
colors and fill the document with white.
|
|
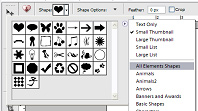
Switch to the Cookie Cutter
Tool (Q) and select an oval shape from the Shape menu
in the Options Bar. If only a few shapes are available
click on the fly out menu and select All Elements
Shapes. Click and drag out the oval shape, starting
in the top left corner of the document. When you have
your shape ‘cut out’, switch to the Move
Tool (V) and click and drag the oval onto the black
matte in the Photo Bin underneath the workspace. This
will move a copy of the oval onto the matte and create
a new layer for it. Handy little trick. Now, do the
same process to move your silhouette onto the double
matte. It should look something like this:
|
 |
The finishing touch to this technique is to add the subject’s
name at the bottom of the oval matte. Switch to the Text
Tool (T) and choose an old-fashioned font. We chose a free
font called Champignon.
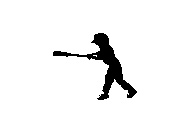
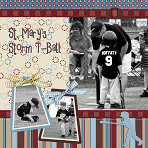
Now that you have this technique added to your repertoire,
you can expand it. You can do a silhouette of any image,
not just a profile bust. You can essentially make a laser
die cut to add to any layout. In this example, we have made
a silhouette out of a t-ball player. The action shot came
out a bit blurry due to low light and a long lens, but we’re
able to salvage it by using this technique. Now we can add
this action silhouette to the layout about his first t-ball
team.
Half of the fun of playing with your photos in graphic
editing programs is that you can get really creative and
crazy. We hope that this technique inspires you to find
more unique uses for your photos.
Article, photo and layout by Angela Moffatt 5.25.2006
|