Surprises
Card Designed by LeNae Gerig
Presented by Sara Naumann
Materials
Needed
Cardmaker’s™
Birthday Clear & Frosted Overlays
Cardmaker’s™ Citrus Creative
Pack
Cardmaker’s™ Citrus Ribbons
5” x6 1/2” blank white card
orange Permapaque Opaque pigment Marker:
Sakura
10 orange mini brads
1/16” wide hole punch
black ink pad
Mini Glue Dots™
foam tape
Instructions
1.
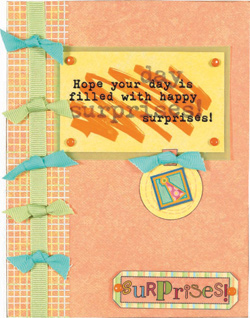
1) Cover the card front with orange sponged paper.
Cut a 1 1/4” x 6 1/2” strip of orange plaid paper and
glue to the right side of the card, flush with the fold. Ink the
card edges black. Cut the overlay quote into a rectangle, turn over
and apply orange marker to the back. Cut a rectangle of yellow the
same size as the overlay and mat both with vellum, trimming to 1/8”.
Punch a hole in each corner and secure an orange mini brad. Glue
1” from the top and 1” from the left edge of the card
front.
2.
2) Cut out the circle tag and glue the circle tag
to the bottom edge of the quote. Cut out the party hat overlay and
glue to the circle. Knot the center of a 4” length of aqua
ribbon, trim the tails at an angle and Glue Dot™ to the top
of the tag.
3.
3) Glue a length of lime ribbon down the center of
the plaid border and trim the ends even with the card edges. Trim
the remaining ribbon into 4” lengths. Knot each length in
the center and trim the tails to 1/2” long. Evenly space and
alternate 3 aqua and 2 lime ribbon knots down the ribbon length,
attaching with Mini Glue Dots™.
4.
4) Cut out the “Surprises!” overlay and
secure over the horizontal tag with brads. Use foam tape to attach
to the bottom right of the card.
5.
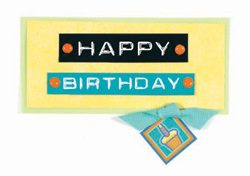
5) For the card inside: Mat a 3 1/2”x1”
rectangle of yellow with green vellum. Cut out the “Happy”
and “Birthday” overlay fragments and secure with brads.
Cut out the cupcake overlay square and glue to the bottom edge of
the rectangle at an angle. Knot a piece of aqua ribbon and add to
the top of the square with a Mini Glue Dot™.