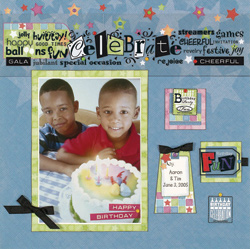
Celebrate
Page
Designed by Susan Cobb
Presented by Sara Naumann
|
| Materials
Needed |
|
 |
Paper Pizazz® Busy
Scrapper’s Solution for Birthday Pages |
|
Slide Mount Mania™ Large Square
Black & White Slide Mounts |
|
Cardmaker’s™ Classic Ribbons
|
|
white cardstock, black cardstock |
|
black ink pad |
|
yellow, red, purple, blue, lime, yellow
mini brads |
|
X-acto® knife, cutting mat |
|
red, lime green, purple Permapaque™
pens (Sakura) |
|
black pen |
| |
|
| |
| Instructions
|
| 1. |
1) Turn the background paper so the star border is
at the top. Cut the “celebrate” overlay border overlay
from the sheet and place over the star border, about 5/8”
from the top of the page. Add brads to the border where shown, to
anchor the overlay in place. Cut out the green tag and slip beneath
the left side of the overlay. Glue in place with the tag top to
the right. |
| 2. |
2) Mat the photo on white cardstock, leaving a very
thin border. Mat again on lime textured squares paper, leaving a
1/4” border. Ink the edges black and glue to the page, about
1 1/2” from the left side and 1” from the bottom. Cover
one slide mount with purple textured squares paper, trimming the
inner and outer edges evenly with the slide mount. Cover a second
slide mount with the lime squares paper. Ink the edges of each.
Glue the “birthday party fun” square overlay to lime
paper and trim the edges evenly. Cut out the squares border and
glue behind the bottom of the purple covered slide. Trim the excess,
then add the “birthday party fun” to the top of the
slide with a mini brad. Glue to the page to the right of the photo.
|
| 3. |
3) Add Permapaque™ color to the back the “fun”
overlay tag and let dry. Attach the tag over the lime slide mount
with a brad. Fold a 1” piece of black grosgrain and extend
from the right of the slide. Cut out the tag, journal on it with
a black pen and glue next to the photo, then add the “fun”
slide mount to the right. Add brad to the top of the tag and knot
the center of a 2” length of ribbon. Trim the ends at an angle
and attach to the top of the tag. Add the remaining overlay square
with a brad as shown. Glue “happy” and “birthday”
overlay word fragments over the corner of the photo and add a brad.
Tie a shoestring bow and attach to the bottom left of the photo.
|
| |
|
| Sponsor:
Hot Off the Press |
|