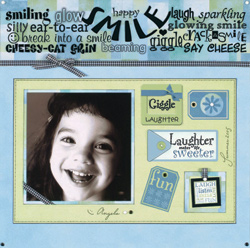
Smile Page
Designed by Susan Cobb
Presented by Sara Naumann
|
| Materials
Needed |
|
 |
Paper Pizazz® Citrus
sarapapers™ |
|
Clear & Frosted Overlays for Scrapbooking
|
|
Cardmaker’s™ Classic Ribbons
|
|
Slide Mount Mania™ Large Square
Slide Mounts |
|
black, white mini brads |
|
black pen |
|
1/8” hole punch |
|
ruler |
|
sewing needle |
| |
|
| |
| Instructions
|
| 1. |
1) Turn the bordered paper so the border is at the
top. Cut out the “smile” overlay border and place over
the border on the background paper. Add white mini brads at each
top corner to hold the overlay in place. Add a black mini brads
in each bottom corner of the background paper. Run a length of black
and white checked ribbon across the bottom edge of the border and
secure the ends to the back of the page. Tie a shoestring bow and
add to the ribbon length, about 3” from the left. |
| 2. |
2) Mat the photo on blue/lime/aqua color blocked paper,
leaving a 3/16” border. Ink the edges black, then wrap the
lower left corner of the photo with checked ribbon, securing the
ends on the back of the mat. Cut a 10 5/8” x 6 7/8”
rectangle of lime linen paper and mat on onyx glimmer paper, leaving
a very thin border. Glue the matted photo to the left side of the
lime paper, then glue centered to the bottom portion of the background
page. Use a ruler and black pen to add a faux stitching border on
the lime mat. |
| 3. |
3) Cut out the overlay pieces. Glue the tag with the
flower over color-blocked paper and trim evenly. Attach to the upper
right of the large photo mat in with the top at the left, using
a black brad and a white brad in the flower center. Add the “Giggle”
slide mount overlay to the left of the tag. Glue the “Laughter
makes life Sweeter” overlay piece centered under them. Punch
a hole through the button holes in the overlay and thread with white
floss. Add the “fun” overlay tag underneath and to the
left using a black mini brad. |
| 4. |
4) Cut a 1” length of ribbon, fold over and
attach like a loop to the top of the “Laugh” square.
Cover a slide mount with color-blocked paper and ink the edges black.
Center the “Laugh” square in the slide mount and attach
next to the “fun” tag. Add the date to the right edge
of the mat as shown, using the black pen. Add a name and brads beneath
the photo. |
| |
|
| Sponsor:
Hot Off The Press |
|