Scrapable
Party Centerpieces
By Jinger Adams
|
| Materials
Needed |
|
 |
12 x 12 cardstock |
|
Rub-ons |
|
Ribbon |
|
Watering can |
|
Spray paint |
|
Floral foam |
|
Glitter glue |
|
Paint brush |
|
Xyron 150 |
|
Extra small dowels – note: should
fit up inside alligator clip. |
|
Alligator clips (found in most automotive
stores) |
|
Ink |
|
Foam squares |
|
Glue dots |
|
Circle punch |
|
Green floral tape |
|
Hot glue gun |
|
Paper trimmer with scoring blade |
|
Disposable camera |
| |
|
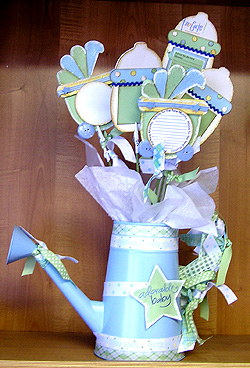
| This project is a lot of
fun, and a unique way of preserving shower and party memories long
after the event has passed. It also doubles for the center-pieces
at your gathering and engages the guests to leave behind their thoughts.
Each bottle or carriage unclips and is double-sided. The first
side has a journaling square that says, “Advice for the
new mommy” where the guest can leave a thought for the mom-to-be.
On the reverse side, is a mount for a photo. During the party,
you can place a disposable camera in front of each centerpiece,
making sure all of the guests get their photo taken during the
shower. When the shower is over and the film gets developed, you
can put the picture with the advice item. Then each piece can
lay out flat in a scrapbook for the new parents to enjoy forever.
|
| |
| Instructions
|
| 1. |
1. You will need to start by picking a base. Make
sure it is sturdy and a little tall so that it can hold up the pieces
coming out of the top. |
| 2. |
2. We have chosen a watering can that we have spray
painted blue to match the Baby Boy theme. Next, you will want to
put some floral foam into your base. This is what you will be sliding
your sticks into. So make sure it is secure and not sliding around.
Just by taking a plastic butter knife, you can shape it to your
desired size. |
| 3. |
3. The next step is fast and fun. You can use four
different patterns to decorate the outside. To get this look on
the handle, you will want to cut strips about 12 inches long and
tie them in knots all the way down the handle and a few on the spout.
|
| 4. |
4. Next, use a little sticker maker to adhere glue
to the back of long strips of ribbon. Size the ribbon first to the
shape of the can and then cut the pieces. Stick one end in and then
pull out the other side. Wrap your ribbon around the can. |
| 5. |
5. For a finishing touch, you can create a star pattern,
paint glitter on it and use some general baby rub-on words placed
them on the star. |
| 6. |
6. Use foam tape on the back to pop it out a little
from the can and make it stand out. |
| 7. |
7. Take a small wooden dowel about 18 inches in length,
making sure it is the size that can fit into your alligator clip.
Use green floral tape and wrap it around the stick giving it a stem
kind of look. Spray the silver clips white. |
| 8. |
8. Using a glue gun, attach the alligator clips onto
your sticks. |
| 9. |
9. Take two different strips of ribbon and wrap them
around the base of each alligator clip to give it a dressed-up look.
|
| |
|
Create the
baby bottle and carriage shapes.
These are double-sided to add our pictures and advice to. If you
don’t want to take the time to create patterns, they can
be found all over from die cut machines, coloring books or clip
art on the internet. There are patterns out there for just about
any idea you want to create. (Make sure they’re not copy-righted).
|
| 1. |
1. Trace your double-sided pattern onto plain white
cardstock making sure it is hooked together. Then fold using a scoring
blade. |
| 2. |
2. Adhere the pattern with colored cardstock and embellishment.
We made the top of the bottle a light tan and then the lid blue.
Before gluing all pieces together, ink the edges with a brown ink
pad and sponge. Let it dry and then go back over it with glitter
glue. |
| 3. |
3. Add the finishing touches by adding polka-dots,
rick-rack, photo turn mounts and rub-ons. |
| 4. |
4. Repeat on the other side but make sure one side
has the advice square and the other has the photo mount. |
| 5. |
5. Trace the pattern of your buggy, making sure it
is connected down the middle. Score with blade and fold. |
| 6. |
6. Cut out all pieces, ink the edges and let it dry.
With a paint brush, spread glitter glue on parts of it. For the
wheels, you can use over-sized buttons. After drying, dab a little
white paint on the edges to make it pop. |
| 7. |
7. To give it dimension, pop out the photo mount,
and top bar of the carriage adding some ribbon. |
| 8. |
8. When all the advice pieces are complete, place
them into your alligator clip and start arranging them into your
centerpiece by sliding the dowels into the foam. Lift some a little
higher or lower, staggering them about. |
| 9. |
9. Add some tissue paper for a finishing touch. |
| |
|
| Sponsor:
Just Jinger/Wilton Industries, Inc. |