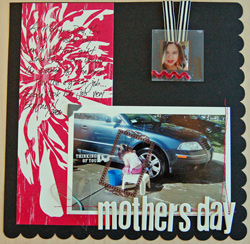
Mother’s
Day - Etched Glass Embellishments
Designed by Ana Cabrera
Presented by Leslie Ayers
|
| Materials
Needed |
|
 |
Cardstock |
|
Patterned paper |
|
Rub-ons |
|
Ribbon |
|
Rickrack |
|
Chipboard |
|
Adhesive vinyl stickers |
|
Glass slides (such as Ranger Memory
Glass) |
|
Craft knife |
|
Cutting mat |
|
Paper plate |
|
Adhesive dots |
|
Glass etching cream (such as Armour
Glass Etch Cream) |
|
Foam brush |
|
Photo (optional) |
|
Clear-drying liquid adhesive |
| |
|
| |
| Instructions
|
| 1. |
1. Take adhesive vinyl sign letters (such as those
found at office-supply stores) and, with a craft knife and cutting
mat, cut out a pattern, shape, or letter. (If you have vinyl letter
stickers, you can use those too.) |
| 2. |
2. Apply vinyl shapes to glass in desired pattern.
Press the vinyl stickers onto the glass firmly, then clean glass
with dry cloth (or use window cleaner), to remove any fingerprints. |
| 3. |
3. Attach the piece of glass to a paper plate with
a small adhesive dot. (Do not press firmly as you want to remove
it.) |
| 4. |
4. Shake the etching cream, and open the lid. (It’s
a good idea to work in a well-ventilated area.) With a foam brush,
brush on a thick layer of glass etching cream onto the glass slide.
Make sure it is covered completely. Wait at least 5 minutes (or
according to the directions on the glass etching cream package). |
| 5. |
5. Rinse the glass embellishment in water to wash
off all the etching cream, taking care not to get any of the cream
on your bare hands. (Use rubber gloves if desired.) |
| 6. |
6. Wash the glass with glass cleaner. Take a small
photo or other printed item and cover the top of it with clear-drying
liquid adhesive. Attach it to the bottom of the glass embellishment,
taking care to wipe off any glue that seeps out at the edges. Let
it dry. |
| 7. |
7. Attach the glass embellishment to your page or
project using adhesive dots or other strong dry adhesive. For best
results, use with dark paper, or patterned paper that will show
through the clear areas of the glass. |
| |
|
| Sponsor:
Scrapbook Answers Magazine |
|