|
“Word Art”
simply put, is using lettering to enhance page design. By
learning a few Photoshop Elements tricks, you can manipulate
and enhance typed words to create fun and beautiful special
effects.
Begin with a quotation, title, or phrase. The internet
is a treasure-trove for finding just the right word for
each occasion. A quick search for “quotations”
produces an array of websites dedicated to the words of
famous people. You are sure to find something to your liking.
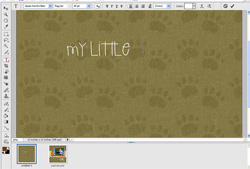 Step
1: From the toolbar, select the Horizontal
Type Tool (T). Choose a font that matches the theme
of your layout. For example, you might choose a whimsical
font for a child’s page or a scripty font for a wedding
page. (The font used here is 2Peas Handwritten, used to
carry out the page theme.) Step
1: From the toolbar, select the Horizontal
Type Tool (T). Choose a font that matches the theme
of your layout. For example, you might choose a whimsical
font for a child’s page or a scripty font for a wedding
page. (The font used here is 2Peas Handwritten, used to
carry out the page theme.)
Type one or more words of your phrase. Click the check mark
to confirm your line of text. Now type another word or line,
clicking the check mark to complete the layer. A key element
in creating interesting word art is to use several layers
to complete the quote.
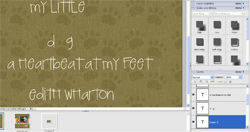
 Step
2: begin arranging the groups of words in an artful
way. You may wish to turn a group of words on the side.
To do this switch to the move tool and
click on the grouping you would like to turn. You should
see a bounding box appear around the text. Step
2: begin arranging the groups of words in an artful
way. You may wish to turn a group of words on the side.
To do this switch to the move tool and
click on the grouping you would like to turn. You should
see a bounding box appear around the text.
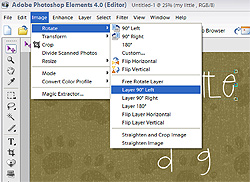 From
the Windows menu, select Image| Rotate| Layer 90°
left. (Note: BE SURE to choose from the middle
box which says “layer 90°” - this will rotate
the LAYER only. The choices at the top section of the box
will rotate your entire layout!) Your selected words should
now be turned. To move them around on the page, simply select
the box, click and drag them into place. From
the Windows menu, select Image| Rotate| Layer 90°
left. (Note: BE SURE to choose from the middle
box which says “layer 90°” - this will rotate
the LAYER only. The choices at the top section of the box
will rotate your entire layout!) Your selected words should
now be turned. To move them around on the page, simply select
the box, click and drag them into place.
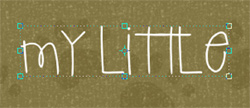
Step 3: You may wish to resize a word
at this point. To do this, select the Move Tool
(V), then click on the word. Your word should be
surrounded by a dotted bounding box. Move the cursor to
the corner of the bounding box. You will see a diagonal
arrow appear. Holding down the shift key, click and drag
out the arrow until the word is the desired size. Holding
the shift key will maintain the proper aspect ratio of your
text. (Otherwise, you may get a funhouse effect with distorted
text.) Click the check mark to confirm the size.
To make the text smaller repeat step 3, dragging inward
to create a smaller box.
 Step
4: if you wish to change the color or font of a
word, select the Text Tool (T). Left click
very close to the beginning of the word. A blue line will
appear under your text. Now click and drag over the entire
word. You will know the word is selected because it will
be shaded. Step
4: if you wish to change the color or font of a
word, select the Text Tool (T). Left click
very close to the beginning of the word. A blue line will
appear under your text. Now click and drag over the entire
word. You will know the word is selected because it will
be shaded.
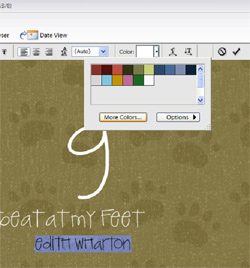
To change the color of the word, choose a color from the
color drop-down menu in the options bar.
Clicking “more colors” will bring up the color
picker menu.
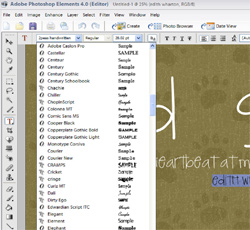
To change the font of the selected word, choose a font
from the font drop-down menu in the options
bar.
Don’t be afraid to experiment with different styles,
colors, fonts and placement – even overlapping words!
You are making a work of art which requires a lot of trial
and error.
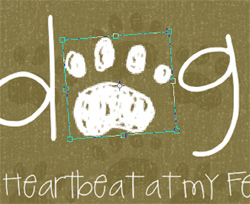
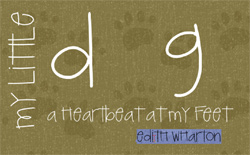
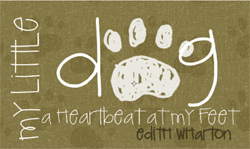
Step 5: adding clip art
or a brush stroke to your word art adds another level of
interest to the project. For this project a paw print was
selected to replace the “O” in the word “dog.”
Simply drag the png file onto your layout. Tilt the graphic
by hovering over the side of the paw print. Once the curved
arrow appears, you can click and drag the graphic left or
right.
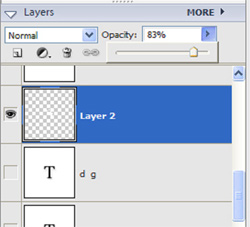
Decrease the opacity of the clipart by moving the opacity
slider above the layers palette
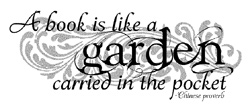
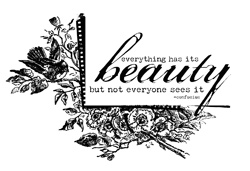
A little word play might be just what you need to enhance
the
theme and visual appeal of your next layout. Here are a
few samples from one of our favorite digital scrapbooking
websites:
Credits:
Paw brush from the “Doggie Doodles” brush set
by MaryAnn Wise at designerdigitals.com; Font: 2Peas Handwritten
downloaded from twopeasinabucket.com; Background Paper from
the “Run Spot Run Paper pack” by Katie Pertiet
at designerdigitals.com
Dream Quote, Beauty and Garden Quote (freebies) by Katie
Pertiet at designerdigitals.com
Sleep Quote (freebie) by Kellie Mize at designerdigitals.com
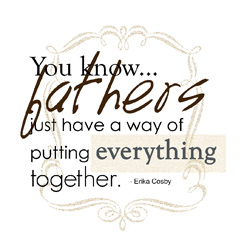
Fathers Quote (freebie) by Jackie Eckles at designerdigitals.com
|