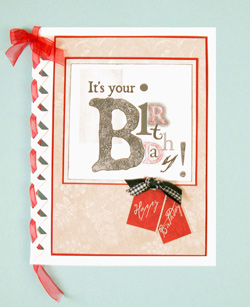
It’s
Your Birthday
Designed by LeNae Gerig
Presented by Sara Naumann
|
| Materials
Needed |
|
 |
Cardmaker’s™ Classic
Creative Pack |
|
Cardmaker’s Classic Ribbons |
|
Cardmaker’s™ Birthday Card
Quotes |
|
Cardmaker’s™ 5”x6
1/2” blank white |
|
Paper Pizazz® Lattice Folds Template |
|
graphite black Brilliance™ ink
pad |
|
red colored pencil |
|
pencil |
|
small scissors |
|
Glue Dots™ |
|
glue stick |
| |
|
| |
| Instructions
|
| For the Lattice Fold: |
| 1. |
1) Follow the directions on the template and place
the lattice pattern along the fold of the card. Trace the template
using a pencil, then cut along the traced lines with a small pair
of scissors. Open the card and erase any visible pencil lines. Fold
the cut lattice down and tuck under the lower lattice to secure.
|
| 2. |
2) Cut a 9” length of sheer red ribbon and weave
it among the lattice, leaving a 1 1/2” long tail at the bottom
and folding the top tail over the top of the card and gluing to
secure. Cut a 6” length of sheer red ribbon and tie it into
a shoestring bow. Attach the bow to the folded-over ribbon at the
top of the lattice work using a Glue Dot™. |
For the Card
Front: |
| 1. |
1) Cut a 4” x 6” piece of tan flowers
paper and ink the edges black. Mat on red glimmer paper and trim
the mat to 1/16”. Center and glue to the card front using
a glue stick. |
| 2. |
2) Cut out the “it’s your birthday”
quote and crop to a 3 1/4” square. Ink the edges of the quote
with black, then mat on tan parchment and trim the mat to 1/8”.
Mat again on red glimmer paper and trim the mat to 1/16”.
Color in the “r” and “d” in the word “birthday”
with a red colored pencil. Center the matted quote in the upper
portion of the tan flowers paper and glue it in place using a glue
stick. |
| 3. |
3) Cut out the “happy” and “birthday”
tags. Using a glue stick, secure them in the bottom right corner
of the card quote at a slight angle, with the “happy”
tag overlapping the “birthday” tag. Cut a 4” length
of black and white gingham ribbon and a 4” length of black
grosgrain ribbon. Hold the two ribbon lengths together and tie a
knot in the center, securing the two lengths together. Trim the
tails to 3/4” and attach the knot to the top of the “happy”
tag using a Glue Dot™. |
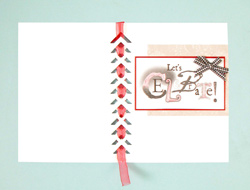
For the Card
Inside: |
| 1. |
1) Cut a 3 3/4” x 3 1/4” piece of tan
flowers paper and ink the edges with black. Glue to the inside of
the card, 1” down from the top and flush with the right edge
of the card. |
| 2. |
2) Cut out the “let’s celebrate”
quote and mat on red glimmer paper, then trim the mat to 1/16”.
|
| 3. |
3) Cut a 3” length of black and white gingham
ribbon and wrap it diagonally around the top right corner of the
matted quote. Wrap the ends of the ribbon around the edges of the
mat, securing them on the back. Cut a 5” length of black and
white gingham ribbon and tie it into a shoestring bow. Attach the
bow on top of the ribbon strip using a Glue Dot™. Color in
the “c”, “l” and “t” in the
word “celebrate” with a red colored pencil. Glue the
quote in the center of the card, as shown, using a glue stick. |
| |
|
| Sponsor:
Hot Off the Press |
|