Fast & Fun Folding-Grandpa’s Little
Rosebud
Designed by Shauna Berglund-Immel
Presented by Sara Naumann
|
| Materials
Needed |
|
 |
Paper Pizazz® Busy Scrapper’s
Solution Girls: Baby & Toddler Papers |
|
Paper Pizazz® Fold-It Swirls Template
|
|
Cardmaker’s™ Icy Rainbow
Ribbons |
|
Cardmaker’s™ Classic Ribbons |
|
white cardstock |
|
tropical mini brads |
|
graphite black Brilliance™ ink
pad |
|
1/8” hole punch |
|
diagonal tags punch |
|
white embroidery floss |
|
Scotch® Brand Foam Mounting Tape |
|
Glue Dots™ |
|
glue stick |
|
black pen |
| |
|
| |
| Instructions
|
| 1. |
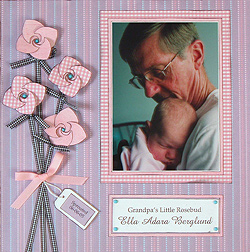
1) Use the purple mini dots paper as the background
and ink the edges with black. Mat the photo on white cardstock,
trimming the mat to 1/16”, then ink the edges with black.
Mat again on pink texture paper, trimming the mat to 1/8”,
then ink the edges with black. Mat again on pink gingham paper,
trimming the mat to 3/8”, then ink the edges with black. Secure
the matted photo in the upper right corner of the page with a glue
stick. |
| 2. |
2) Computer journal the page title and name onto white
cardstock, then crop and ink the edges with black. Mat on purple
texture paper, trimming the mat to 1/16”, then ink the edges
with black. Mat again on pink texture, trimming the mat to 1/8”,
then ink the edges with black. Center the journaling below the photo,
then adhere to the page with one blue mini brad in each corner of
the white cardstock. |
| 3. |
3) Using the template, trace two fold-it swirls rose
shapes each on the back of pink texture paper and pink gingham paper.
Cut out and ink the edges with black, then fold as instructed. Place
one blue mini brad in the center of each folded rose shape. |
| 4. |
4) Cut varying lengths of black and white gingham
ribbon. Attach the strips vertically up the left side of the background
paper, criss-crossing each other, using Glue Dots™. Wrap one
end of each ribbon around the bottom edge of the paper to secure
on the back. Using foam tape, add the fold-it swirl rose shapes
to the ends of the gingham ribbon lengths. Cut 4 lengths of black
and white gingham ribbon and tie them into knots and shoestring
bows. Attach one knot or bow just below each of the rose shapes
using Glue Dots™. |
| 5. |
5) Punch one diagonal tag shape out of white cardstock
and ink the edges with black, then punch a 1/8” hole at the
top. Cut a 3 1/2” length of white embroidery floss and thread
it through the hole, then tie it into a knot. Computer journal the
birth date onto purple texture paper, then crop to 7/8”x1
3/8” and ink the edges with black. Center on the white tag
and secure using a glue stick. Use a Glue Dot™ to adhere the
embroidery floss to the gingham ribbon strips, then secure the tag
on the background paper with foam mounting tape. Cut an 11”
length of pink grosgrain ribbon and tie it into a shoestring bow.
Secure the bow to the gingham ribbon strips, in the same place as
the embroidery floss, using a Glue Dot™. |
| |
|
| Sponsor:
Hot Off The Press |
|