Family Portrait
12” x 12” page Designed by Carlene Hunsaker
Presented by Nancy Hill
Materials
Needed
DCWV Inc. Ocean 1 Textured Cardstock
– 1 12”x12” sheet, and one 2 ¼”
x 5” strip
DCWV Inc. Ocean 3 Textured Cardstock
cut to 5 ¼ x 7 ¼”, and 2” x 4 ¾”
DCWV Inc. 12”x12” White
Embossed Cardstock – Striped
DCWV Inc. Black & White “Family
Portrait” Sticker Quote
DCWV Inc. Mini Brads – Dark Blue
5/8” Square Punch
1/16” Circle Punch
Archival Multi-Surface Chalk Ink Pad
– Night Sky
Curly Q Paper Clip
7” of 1/16” Navy Satin Ribbon
7” of ¼” White Satin
Ribbon
Instructions
1.
1. Lightly rub Chalk Ink over the entire surface of
the white striped embossed cardstock bringing out the embossed pattern.
2.
2. Cut inked embossed cardstock into one 8 ½”
x 10 ½” sheet, one 7 ½” x 1” strip
and one 8 ¼” x 1” strip.
3.
3. Punch out 7 squares of Ocean 3 cardstock with the
5/8” square punch.
4.
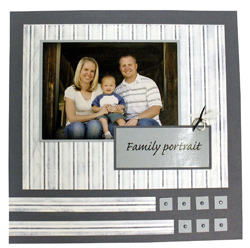
4. Adhere a 5” x 7” family portrait to
the 7 ¼” x 5 ¼” piece of Ocean 3 cardstock.
5.
5. Adhere a “Family Portrait” black and
white clear sticker to the 2” x 4 ¾” piece of
Ocean 3 cardstock and trim any excess sticker that hangs over the
sides.
8.
8. Adhere the “Family Portrait” title
to the 2 ½” x 5” piece of Ocean 1 cardstock.
9.
9. Adhere the 10 ½” x 8 ½”
piece, the 1” x 7 ½” strip, and the 1”
x 8 ¼” strip of colored embossed cardstock to a 12”
x 12” page of Ocean 1 cardstock – see sample for positioning.
10.
10. Adhere matted family photo to 8 ½”
x 10 ½” piece of colored embossed cardstock - see sample
for positioning.
11.
11. Adhere matted “Family Portrait” title
the lower right edge of photo – see sample for positioning.
12.
12. Adhere the 7 - 5/8” punched squares of Ocean
3 cardstock to the right of the cut strips of colored embossed cardstock.
13.
13. Punch a 1/16” hole in the center of each
square using the 1/16” circle punch.
14.
14. Attach a dark blue DCWV Mini Brad in the center
of each Ocean 3 5/8” square.
15.
15. Take the curly Q clip and tie on the strip of
white ribbon and the strip of navy blue ribbon and trim the excess.
16.
16. Clip the curly Q clip on the “Family Portrait”
title – see sample for
positioning.