Tin Album
Designed by Carlene Hunsaker
Presented by Nancy Hill
|
| Cover |
 |
Materials
Needed |
 |
- DCWV Inc Green 1 Cardstock |
 Page detail
 |
|
- DCWV Inc Ocean 2 Cardstock
|
|
- DCWV Inc Red 2 Cardstock |
|
- DCWV Inc Gold Brad |
|
- DCWV Inc Dollar Stickers, White Alphas |
|
- DCWV Inc Posies |
|
- Corner Rounder Punch |
| Instructions
|
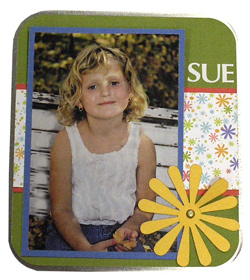
| 1. |
1. Cut a 4 5/8” x 5 ¼” piece of green cardstock.
Round the corners. Adhere to center of tin. |
|
| 2. |
2. Cut a 2 ¼” x 4 5/8” red strip, and a 2”
x 4 5/8” strip from the printed paper. Adhere each piece,
respectively, to center of tin. |
|
| 3. |
3. Mount photo on blue cardstock. Cut out picture, leaving a small
edge of visible cardstock and mount on desired side of tin. |
|
| 4. |
4. Embellish with alphabet stickers, flower, and brad. |
|
| |
|
|
Page
1 |
Materials
Needed |
|
- DCWV Inc Pink 3 Cardstock |
|
|
- DCWV Inc Green 3 Cardstock |
|
|
- DCWV Inc Yellow 3 Cardstock |
|
|
- DCWV Inc Posies |
|
|
- DCWV Inc Pink Buttons |
|
|
- Corner Rounder Punch |
|
Instructions
|
| 1. |
1. Cut a 4 ¾” x 4 1/8” piece of pink cardstock,
a 3 7/8” x 2 1/2” piece of green cardstock and a 3 ¼”
x 3 1/8” piece of yellow cardstock. Round the corners of each
piece. |
|
| 2. |
2. Adhere cardstock to page 1, with the pink first, followed by
the yellow and green (to be used as accent colors). |
|
| 3. |
3. Embellish with a flower and button. |
|
| |
|
|
Page
2 |
Materials
Needed |
|
- DCWV Inc Green 3 Cardstock |
|
|
- DCWV Inc Pink 1 Cardstock |
|
|
- DCWV Inc White Cardstock |
|
|
- DCWV Inc Teen Stack Plaid Print |
|
Instructions
|
| 1. |
1. Cut a 4 ¾” x 4 1/8” piece of green cardstock,
a 4 1/8” x 2 ½” strip of printed paper, a 1”
x 4 ¼” strip of white cardstock and a ¾”
x 4 1/8” strip of pink cardstock |
|
| 2. |
2. Round corners of green cardstock; adhere to center of 2nd page. |
|
| 3. |
3. Adhere printed paper strip to top of green cardstock. |
|
| 4. |
4. Adhere white and pink cardstock pieces, respectively, to bottom
area of green cardstock. |
|
| |
|
|
Page
3 |
Materials
Needed |
|
- DCWV Inc Pink 1 Cardstock |
|
|
- DCWV Inc Teen Mat Stack Argyle print |
|
|
- DCWV Inc White Cardstock |
|
|
- DCWV Inc Green 1 Cardstock |
|
|
- Heart Punch |
|
|
- Corner Rounder Punch |
|
Instructions
|
| 1. |
1. Cut a 4 ¾” x 4 1/8” piece of pink cardstock,
a 4 ½” x 2 ½” piece of the argyle print,
and a 3 5/8” x 1 ¼” piece of white cardstock. |
|
| 2. |
2. Round all 4 corners of the pink cardstock. Also round 2 corners
of the printed paper (the ones on the 4 ½” side). |
|
| 3. |
3. Adhere pink cardstock to the center of page 3. Adhere the printed
paper piece to the right side of page 3, and the white cardstock
piece to the top of page 3. |
|
| 4. |
4. Embellish with a green cardstock heart. |
|
| |
|
|
Page
4 |
Materials
Needed |
|
- DCWV Inc Yellow 3 Cardstock |
|
|
- DCWV Inc Pink 3 Cardstock |
|
|
- DCWV Inc Pink 1 Cardstock |
|
|
- DCWV Inc Green 1 Cardstock |
|
|
- DCWV Inc Teen Mat Stack Multi-stripe print |
|
|
- DCWV Inc Pink Brads |
|
|
- Corner Rounder Punch |
|
|
- 1/16” Hole Punch (Unknown source) |
|
Instructions
|
| 1. |
1. Cut a 4 ¾” x 4 1/8” piece of yellow cardstock,
a 2 ½” x 4 1/8” piece of light pink cardstock
and a ¾” x 4 ¾” piece of the printed paper,
with the stripes going the long way. |
|
| 2. |
2. Round all the edges of the yellow cardstock piece; adhere to
center of page 4. |
|
| 3. |
3. Round 2 edges of the light pink cardstock (along the 4 1/8”
border) and apply glue to outside edges of cardstock (in order to
make a pocket); adhere to bottom of yellow cardstock. |
|
| 4. |
4. Adhere printed paper strip to top area of light pink cardstock. |
|
| 5. |
5. Cut a tag out of the dark pink cardstock, approximately 4”x
2 ¾” |
|
| 6. |
6. Cut another tag from the green cardstock, approximately 3 ¾”
x 2 ½”. Adhere to center of dark pink tag. |
|
| 7. |
7. Punch hole in tip of green cardstock and insert brad. Put tag
in pocket. |
|
| |
|
|
Page
5 |
Materials
Needed |
|
- DCWV Inc White Cardstock |
|
|
- DCWV Inc Green 2 |
|
|
- DCWV Inc Christmas Scrapbook Kit Green Polka-dot Print |
|
|
- DCWV Inc Green Buttons |
|
|
- DCWV Inc Green 3/8” ribbon |
|
|
- Corner Rounder Punch |
|
Instructions
|
| 1. |
1. Cut a 4 ¾” x 4 1/8” piece of green cardstock,
a 4 ½” x 2 ¼” and a 3”x 6”piece
of white cardstock, and a 2” x 4 ¼” piece of
printed paper. |
|
| 2. |
2. Round all 4 corners of the green cardstock. Adhere to middle
of page 5. |
|
| 3. |
3. Round 2 corners on the 4 ½” side of the 2nd white
cardstock. Adhere to left side of green cardstock. |
|
| 4. |
4. Round 2 corners on the 4 ½” side of the printed
paper. Adhere to the white cardstock piece. |
|
| 5. |
5. Round all 4 corners of the remaining piece of white cardstock.
Fold in half, and adhere to printed paper so that cardstock functions
as a card. |
|
| 6. |
6. Embellish “card” with a button and some ribbon. |
|
| |
|
|
Page
6 |
Materials
Needed |
|
- DCWV Inc Pink 1 Cardstock |
|
|
- DCWV Inc Pink 3 Cardstock |
|
|
- DCWV Inc Spring Stack 2 Butterfly Print |
|
|
- Ribbon (Unknown Source) |
|
|
- 1 ½” Circle Punch |
|
|
- 1 ¼” Circle Punch |
|
|
- Corner Rounder Punch |
|
|
-1/8” Hole Punch (Unknown source) |
|
Instructions
|
| 1. |
1. Cut a 4 ¾” x 4 1/8” piece of the light pink
cardstock, a 3” x 4 ¾” piece of dark pink cardstock,
and a 2” x 4 ¾” piece of printed paper |
|
| 2. |
2. Round the edges of the light pink cardstock; adhere to center
of page 6. |
|
| 3. |
3. Adhere the dark pink cardstock to the center of the light pink
cardstock. |
|
| 4. |
4. Adhere printed paper to the center of the dark pink cardstock. |
|
| 5. |
5. Punch a 1 ½” circle out of the dark pink paper;
punch a 1 ¼” circle out of the light pink paper. Adhere
2 circles together, and punch 1/8” hole near the top of the
light pink paper. |
|
| 6. |
6. Attach ribbon to sides of page. Tie circles into ribbon knot.
Trim ends of ribbon. |
|
| |
|
|
Page
7 |
Materials
Needed |
|
- DCWV Inc Yellow 3 Cardstock |
|
|
- DCWV Inc Pink 3 Cardstock |
|
|
- DCWV Inc Striped Print |
|
|
- DCWV Posies |
|
|
- Corner Rounder |
|
Instructions
|
| 1. |
1. Cut a 4 ¾” x 4 1/8” piece of yellow cardstock.
Round the edges and adhere to the center of page 7. |
|
| 2. |
2. Cut 2 pieces of the printed paper (2 1/8” x 2 3/8”),
with the stripes going vertical. Round one of the outside edges,
and adhere to the top left and bottom right corners of the yellow
cardstock. |
|
| 3. |
3. Cut a 3 ¼” x 4” piece of pink cardstock.
Adhere to center of yellow cardstock |
|
| 4. |
4. Cut a 3” x 3 ¾” piece of yellow cardstock.
Adhere to center of pink cardstock. |
|
| 5. |
5. Embellish page with a flower. |
|
| |
|
|
Page
8 |
Materials
Needed |
|
- DCWV Inc Pink 1 |
|
|
- DCWV Inc Pink Friends Openstock Printed Paper |
|
|
- DCWV Inc 5/8” Adhesive Brown Ribbon |
|
|
- Staples |
|
Instructions
|
| 1. |
1. Cut a 4 ¾” x 4 1/8” piece of pink cardstock.
Adhere to the center of page 8. |
|
| 2. |
2. Cut a 3 ¾” x 3 ¾” piece of printed
paper. Adhere to the center of pink cardstock. |
|
| 3. |
3. Embellish with ribbon and a staple. |
|
| |
|
|
Page
9 |
Materials
Needed |
|
- DCWV Inc Green 2 Cardstock |
|
|
- DCWV Inc Pink 1 Cardstock |
|
|
- Sizzix Scalloped Oval Frame |
|
|
- Corner Rounder |
|
Instructions
|
| 1. |
1. Cut a 4 ¾” x 4 1/8” piece of green cardstock;
adhere to the center of page 9. |
|
| 2. |
2. Cut out frame with Sizzix die; Adhere to center of page. |
|
| Sponsor:
Die Cuts with a View |