Close this window to return to series
100 project listing
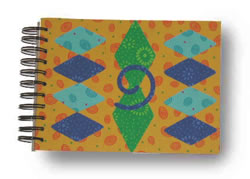
Fabric
Covered Memory Book
by Andrea Rothenberg, CCD, CPD
Materials
Needed
Fiskars ShapeCutter™ cutting tool
Fiskars ShapeTemplates™, Diamonds
Celebration (or your choice)
Fiskars 9”x12” craft mat
Fiskars Non-stick™ scissors
Paper Reflections® “Create
Your Own” Memory Book
PeelnStick™ double sided adhesive
Fabric of your choice
Instructions
1.
The fabric should be pre-washed and ironed to remove
any sizing in the fabric. This will improve the bond between the
adhesive and the fabric.
2.
Adhere one side of the double-sided adhesive to a
piece of fabric large enough for the cover of your book. Follow
the manufacturer’s instructions to remove the cover of the
book to make it easier to work on. Peel off the other side of the
adhesive and stick the fabric to the album cover. Use the non-stick
scissors to trim the excess fabric around the edges.
3.
Adhere the double-sided adhesive to the back of the
fabric you choose to use for your cutout designs. Lay the area of
the fabric that will be cut on the craft mat with the right side
up. Refer to the manufacturer’s instructions to use the ShapeCutter™.
The blade may need to be a bit lower to cut through the fabric and
adhesive. Place the template on the fabric. Make sure that the template
is the right side up for cutting (words read correctly) Place the
opening of the desired shape over the area of fabric to be cut.
Place the ShapeCutter™ inside and cut out the shape. Continue
cutting out as many shapes from the different fabrics to create
your designs.
4.
Lay the cut shapes onto the cover to arrange your
design. When you have your desired design, remove the backing and
stick the fabric pieces in place.
5.
If desired, add fabric shapes to the pages in your
book.