Close this window to return to series
100 project listing |
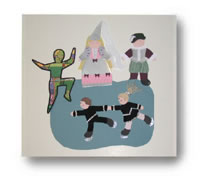
Paper
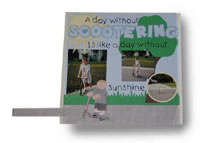
Doll Pages - "A Day without Scootering"
by Darcy Mallo - Beeler |
| Materials
Needed |
  |
| |
 |
12 x 12 blue check pattern paper for
background |
| |
|
8½ x 11 blue check pattern paper
for letters |
| |
|
Coordinating cardstock for letter shadowing |
| |
|
8 ½ x 11 white cardstock |
| |
|
12 x 12 gray pattern paper or cardstock
for sidewalk |
| |
|
Die Cuts (sun, tree, grass) |
| |
|
Alphabet template |
| |
|
Paper doll (Paperkins or other decorated
as desired) |
| |
|
Scooter die cut or punch out (punch
out from Doodlebug) |
| |
|
1/16" foam adhesive strips |
| |
|
Pattern for sidewalk and pull tab |
| |
|
Pencil |
| |
|
Metal ruler |
| |
|
Cutting mat |
| |
|
Metal craft knife |
| |
|
Scissors |
| |
|
Acid-free adhesive |
| |
|
Black pen for journaling |
| |
|
|
| Instructions
|
| |
1. |
Shape paper doll to appear as if riding scooter and
decorate as desired. Adhere doll and scooter to white card stock
for strength and cut out in one piece. |
| |
2. |
Following the pattern for sidewalk and pull tab, trace
and cut out pieces from gray pattern paper. Adhere one side of the
folding tab piece to the lower backside of the paper doll with the
crease of the fold facing up. Using the metal ruler and craft knife,
cut a slit in the front sidewalk piece along the cut line from the
pattern. |
| |
3. |
Working with the patterns face down, insert the folded
tab on the paper doll through the slit on the front of the sidewalk
piece, positioning the doll at one end of the sidewalk. Adhere folded
tab to the pull strip from the pattern (for extra strength, you
may want to cut the pull strip from cardstock and adhere it to the
pattern paper). |
| |
4. |
Adhere 1/16" foam adhesive to top and bottom
of the front of the back sidewalk piece. Attach front sidewalk to
back sidewalk, positioning the paper doll on the top front piece.
Adhere completed sidewalk/paper doll piece to bottom edge of 12
x 12 pattern paper. When you pull the tab pull strip, the doll with
glide across the page and show scootering movement. |
| |
5. |
Add die cut grass strip to top of sidewalk piece and
arrange sun and tree die cuts on page. Adhere photos around page. |
| |
6. |
Trace and cut out title letters using alphabet template
and blue check pattern paper and shadow letters with coordinating
cardstock. Adhere across page. Add additional lettering with black
pen. |
© Memory Makers
2002
For More Information, or to subscribe contact:
Memory Makers magazine
12365 Huron Street, Suite 500
Denver, CO 80234
1-800-366-6465 |