Close this window to return to series
100 project listing
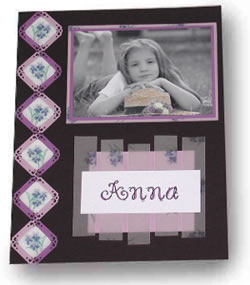
Periwinkle
Anna by Diana Swensen
Materials
Needed
Light, medium and dark shades of 8 1/2
by 11 purple cardstock
1 sheet of 8 1/2 by 11 white cardstock
Fiskars lace 3 in 1 corner punch
Fiskars 12 inch paper trimmer
Fiskars Clear mounting stickers
Fiskars Periwinkle vellum from the “Impressions”
Photo memories Vellum book
Fiskars purple metallic gel pen
Fiskars Shape Cutter
Fiskars Shape Cutter square template
DJ Inkers “Frilly” font
Photo tinting markers
Instructions
1.
Using the Shape Cutter, Shape cutter square template,
cut six 1.50 by 1.50 squares. Three out of light purple cardstock
and three out of medium purple cardstock.
2.
Punch each corner of each square with the lace 3 in
1 corner punch. See example page for correct lace corner.
3.
Cut each square in half then reassemble them onto
the page as shown, with a light half on one side and a medium half
on the other side. (see page for reference)
4.
Cut six 1.5 by 1.5 squares from white cardstock, and
six from the Periwinkle vellum. When cutting the vellum be sure
to center the square over the blossoms.
5.
Attach vellum squares to white cardstock squares using
Fiskars clear mounting stickers
6.
Center and adhere white squares onto the purple squares
that form the border. (see page for reference)
7.
Mount photo onto Medium purple cardstock and trim
to 1/8 inch
8.
Mount Iris vellum onto light purple cardstock, add
matted photo and trim to 1/8 inch.
9.
Adhere matted photo to top of page.
10.
Cut light purple cardstock 3 3/8 by 4 1/8 inch, center
below photo and adhere to page
11.
Cut five pieces of Periwinkle vellum 4 1/4 by 7/8
inch. Place onto light purple cardstock. (see page for reference)
12.
Print child’s name onto white cardstock using
DJ Inkers “frilly” font
13.
With printed name in center cut white cardstock 1
3/4 by4 3/4 inches.
14.
Using Fiskars purple metallic gel pen color in font.
15.
Center and adhere name tag to top of vellum strips.