Close this window to return to series
100 project listing |
Color
Adjusting - Green Tones Layout
by Eastmen Kodak Company |
| Materials
Needed |
 |
| |
 |
A favorite picture |
| |
|
Paper: |
| |
|
12" x 12" Black Embossed Floral
paper by K & Company |
| |
|
Ocean green cardstock |
| |
|
Black cardstock |
| |
|
Punches: fern leaf, ash leaf, and square |
| |
|
Zig Millennium pen |
| |
|
Dry embossing stylus |
| |
|
Hermafix double-sided adhesive squares |
| |
| Instructions
|
| |
1. |
Fix a favorite picture
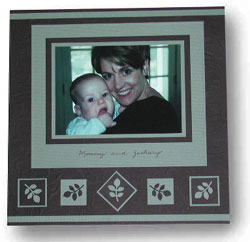
You can make a good snapshot into a great picture when you take
it to a KODAK Picture Maker. In this original, the Mom and son
had too much red in their faces. By enhancing the green tones,
we changed the mood of the picture, and better coordinated the
picture with the page layout.
Start by following the on-screen directions to make a 5"
x 7" enlargement. Next, press the Edit button and choose
Adjust Color. For a picture that's too red, press the "up"
arrows on the screen to increase the amount of blue and green
in the picture. Go ahead and try it – the screen will show
you a preview of how it looks, and you can always press Start
Again if you don't like the results. Remember, you don't pay for
anything until you actually make a print. |
| |
2. |
Mat the KODAK Picture
Maker print
Mat your new, improved picture on green cardstock, then black cardstock,
and then again on green – leaving a wide edge.
Using a dry embossing stylus and the edge of any plastic template,
dry emboss an edge all around the larger green mat.
|
| |
3. |
Add a simple title
To personalize your layout, write your title on the large green
mat with your black pen. And adhere the matted photo to the Black
Embossed Floral background paper.
|
|