Close this window to return to series
100 project listing
Wedding
Memories Layout
by Eastmen Kodak Company
Materials
Needed
Five favorite wedding pictures
Paper:
12" x 12" Light blue cardstock
12" x 12" K & Company
floral embossed paper
Plain vellum
3-D Dove and Flower stickers; Jolee’s
Boutique
Ribbon and eyelets
1" square punch
Hermafix double-sided adhesive squares
Mini glue dots
Instructions
1.
Title your pictures
Take wedding pictures to a KODAK Picture Maker to make four 4"
x 6" reprints and one 5" x 7" enlargement. The pictures
you copy should be snapshots or, if they were professionally taken,
you'll need a letter from the copyright holder giving you permission
to reproduce them.
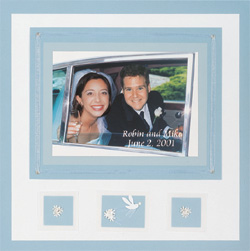
In the Edit function, you can Zoom & Crop to make each picture
just the way you want it. Next, touch the Add Text button on the
screen and follow the on-screen directions to create the title
and journaling right on your pictures. We used a formal typeface
in simple white and black for this wedding layout, but the KODAK
Picture Maker gives you lots of styles and colors to choose from.
2.
Set the stage with paper
Trim a 12" x 12" piece of the floral embossed paper by
1" on two sides and adhere it to a 12" x 12" piece
of light blue cardstock, leaving a 1/2" border blue all the
way around. Repeat for the second background page.
3.
Mat your pictures
Mount your focal point photo on plain vellum and then again on blue
cardstock, leaving a large border all the way around. Attach eyelets
to each corner of the blue mat and string thin ribbon through the
eyelets. Knot the ribbon in back and secure with adhesive. Adhere
the mounted picture to the background page.
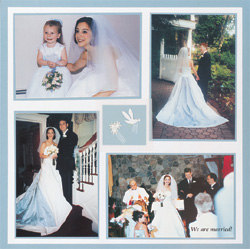
Mount the accent pictures on light blue cardstock and arrange
them around the outer edges of the right page, leaving a spot
in the middle for a dove/ribbon embellishment.
4.
Embellish the layout
Punch two squares from light blue cardstock using the square punch
and cut two pieces of plain vellum slightly larger than the punched
squares. Adhere flower stickers to the vellum. Then attach the vellum
to the cardstock using mini glue dots.
Cut two 2" x 11/2" rectangles from light blue cardstock
and then cut two pieces of vellum slightly larger than the cardstock.
Attach one dove/ribbon sticker to each piece of vellum. Then attach
the vellum to the cardstock with a mini glue dot.
Create a border on the bottom of your left page by affixing the
two flower squares and one dove rectangle to the background paper.
Affix the other dove/ribbon rectangle to the right page in the
center of your accent pictures.