Close this window to return to series
100 project listing |
| Specialty
Paper |
| Instructions |
 |
| |
1. |
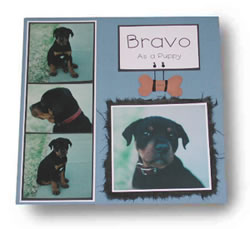
First, select a focal photo (the one
you want to highlight) and enlarge it at picture kiosk or on your
personal computer. |
| |
2. |
Mount the focal photo on white cardstock. |
| |
3. |
Matte the focal photo on a piece of
black mulberry specialty paper leaving more than an inch border
around the entire photo. |
| |
4. |
Take a small paintbrush and dampen it
with water. About an inch from the edge of the photo dampen the
mulberry paper. Essentially, you should draw a square around the
focal photo. |
| |
5. |
Gently tug at the mulberry paper and pull off the
paper outside of the square. Be sure to leave a fringe of the mulberry
paper around the focal photo. You may have to dampen more areas
of the mulberry until you get the desired mulberry border around
the photo. |
| |
6. |
Mount the focal photo on the blue cardstock.
PLEASE NOTE: It’s always good to mount your photos on cardstock
before adhering
them to specialty papers. This will act as a buffer between the
photo and the specialty
paper. Specialty papers, like mulberry, do contain some lignin,
which can damage
photos over time. |
| |
7. |
Crop three photos into the same size and mount them
on a strip of black paper. |
| |
8. |
Then mount that horizontal strip onto a piece of white
cardstock. Adhere this strip to the 12x12 blue cardstock. |
| |
9. |
Print a title using your computer fonts or your own
handwriting. |
| |
10. |
Mount the white title onto black cardstock. |
| |
11. |
Punch to black eyelets at the bottom of title. |
| |
12. |
Cut out brown cardstock into the shape of a bone. |
| |
13. |
Use brown chalk and chalk along the edge of the bone
to give the cut-out some texture. |
| |
14. |
Wrap embroidery floss around the bone and attach the
bone to the title through the eyelets. |
|