Close this window to return to series
100 project listing |
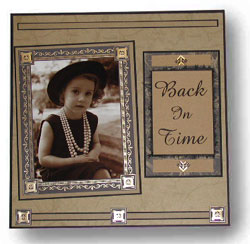
Period
Style Picture Layout
by Eastman Kodak Company |
| Materials
Needed |
 |
| |
 |
Four classic pictures |
| |
|
Paper: |
| |
|
12" x 12" Gold Plume paper
by Anna Griffin |
| |
|
12" x 12" Black Plume paper
by Anna Griffin |
| |
|
Cardstock in tan and black |
| |
|
Black mulberry paper |
| |
|
K & Company stickers – antique
black photo corners and borders |
| |
|
Hermafix double-sided adhesive squares |
| |
|
Antique-style lettering via lettering
template, or use a computer for font types and print |
| |
|
Q-Tips |
| |
| Instructions |
| |
1. |
Take your pictures back
in time
Take color pictures to a KODAK Picture Maker and follow the on-screen
directions to make 4" x 6” reprints and two 5" x
7" enlargements. In the Edit function, choose Print Sepia-tone.
This will give you pictures with a wonderful, timeless feeling. |
| |
2. |
Create an elegant
backdrop
Trim the Gold Plume paper slightly and mat it on black cardstock,
leaving a small edge on all four sides. Repeat for the second
page of the layout.
Cut three strips of tan cardstock to 1/2" x 111/2".
Mat each on black cardstock. Attach one strip to the top of one
of the background pages, 1/2" from the top. Attach the other
two strips to the bottoms of both background pages, 1/2"
from the bottom. Decorate the strips at the bottom edge of each
page with black and gold square stickers. |
| |
3. |
Frame your photos
Use the black and gold stickers to create a border around the focal
picture. Place a square sticker on each corner. Mat the focal picture
on tan cardstock, then mat it again on black cardstock. Affix the
picture to the left side of the left layout page at a slight angle. |
| |
4. |
Title the layout
Look for a typeface with an antique look, using either a lettering
template or a computer and printer. Print your title onto tan cardstock
and cut it into a rectangle. Mat the title block on black mulberry
paper. Wet the edges of the mulberry paper with a wet Q-Tip, and
tear it away for the frayed look.
Now mat the title block in the center of a 61/2" x 4"
piece of Black Plume paper. And mat it again on black cardstock.
Cut small strips of tan cardstock to put along top and bottom
of the title within the block. Attach photo corner sticker for
accents. Finally, affix the title block to the background paper. |
| |
5. |
Add the finishing touches
To complete the right side of your layout, attach photo corners
on the other 5" x 7" picture and mat it on tan cardstock.
Affix it to the background paper on the left side of the page.
Cut the two accent pictures into squares and mat them on tan
card stock. Mat both pictures on a single piece of Black Plume
paper, then mat it again on black cardstock. Affix these to the
right side of the page.
Complete your journaling on tan cardstock. Cut out the journaling
block and mat it on black mulberry paper. Again, wet the edges
and tear away at them to create a feathery, frayed look. Affix
this block to the background. |
|