Close this window to return to series
100 project listing
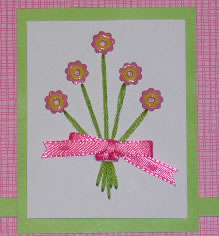
Eyelets
Instructions
Cut a small square of white cardstock
and mount it onto a piece of bright green cardstock.
Sew five stems onto the square using
bright green embroidery thread.
At the end of each "stem",
place an eyelet hole-punch and lightly tap the end with a hammer.
Make sure the eyelet hole-punch is straight and at a ninety degree
angle to the surface of the paper. Make sure you do this work on
a self-healing matte.
Place a large 3/8" eyelet ( in
this case a pink flower-shaped eyelet ) in the hole with the pretty
side facing you.
1.
Flip the square of paper over and place the eyelet
setter into the hole of the eyelet. Lightly tap the eyelet until
the sides bend down and flatten. Lift up the eyelet setter and lightly
tap the eyelet with the hammer to flatten out any metal.
2.
Next, insert a smaller 1/8" eyelet into the center
of the flower eyelet. Take a hammer and repeat the process with
the eyelet setter and hammer. This is called nesting eyelets.
3.
Repeat this for the remaining four flowers at the
top of the stems.
4.
Tie a pink ribbon around the stems of the flowers.
5.
Cut one strip of bright green paper and place along
bottom edge of 12 x 12 hot pink paper.
6.
Adhere the small square with the flower stems onto
the pink stockcard.